Login with the Built-In Laravel 5 Scaffolding
Let’s look at the built in scaffolding (controllers, and views) that Laravel comes with to help speed up our login process. This scaffolding comes with many parts to get our authentication up and running. We actually don’t even have to write a single line of code.
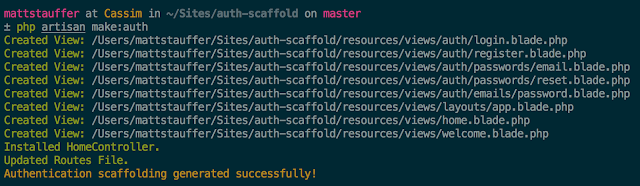
This scaffolding comes with:
- Auth controller
- Routing
- Views with Styling
Getting Started
Go ahead and get Laravel installed and get your environment setup including your database connection. We suggest using Scotch Box or Laravel Homestead.
NOTE: We’ll be using Laravel Homestead and have routed this application to http://laravel.app.
Once you can see Laravel in the browser, you’re good to go!Routing
When starting up a Laravel application, the routing file (app/Http/routes.php)
is going to be one of the first files we dive into. If you go look at
the default routes file, you can see that Laravel has already wired up
the routes for the built-in authentication.
Route::controllers([
    'auth' => 'Auth\AuthController',
    'password' => 'Auth\PasswordController',
]);
Another thing to note is that since we are routing the controller to
'auth', then all the routes on that controller will be nested under /auth/. For example, our route will be http://laravel.app/auth/login.Both of these routes are implicit controllers. This means that the routing is defined by the controller itself. All you need to do is add the HTTP verb in your method and Laravel will handle the routing.
AuthController
If we look in theAuth\AuthController (located at app/Http/Controllers/Auth/AuthController.php), another file is referenced that has a trait: Illuminate\Foundation\Auth\AuthenticatesAndRegistersUsers. This is a file that you won’t change and if you want to customize this whole process, the views are your main choice.If we dig deeper and look into that file, we’ll be able to see there are the following methods and routes:
| Method Name | URL | Description |
|---|---|---|
| getRegister() | GET http://laravel.app/auth/register | Show the register page |
| postRegister() | POST http://laravel.app/auth/register | Process the register form |
| getLogin() | GET http://laravel.app/auth/login | Show the login form |
| postLogin() | POST http://laravel.app/auth/login | Process the login form |
If we go ahead and try to register our user at http://laravel.app/auth/register, we will have have problems since we haven’t fully set our database up yet.
Database Migrations
This error happens because we don’t yet have the tables in our database. How can we save a user to the database if there is no user table? We will need to create a migration to create our user table.Luckily for us, the migrations are also included in the scaffolding! We just have to SSH into our VM, find the root folder of our application, and run the migration.
# ssh into our vm
$ homestead ssh

# find our directory
$ cd laravel

# run the migrations
$ php artisan migrate
Registering
Let’s go back to that registration form and try again. Fill in the form and we won’t see that error anymore.Click into the users table and you can see the new user created with the hashed password.


 Using CodeIgniter and Bootstrap")
 Using PHP PDO and Bootstrap")


