Showing posts with label Php. Show all posts

Sublime Text (3) for PHP Developers

22:39:00

A lot of folks in the PHP community have been checking out PHPStorm lately, including myself and most of the developers I work with. We love the code intelligence we get from PHPStorm, but still miss the speed, quick boot-up, and convenience of Sublime Text.
Before I blindly assume PHPStorm is the only way to go, I wanted to see: Can I bring the things a PHP-focused IDE provides PHP developers back to Sublime Text and get the best of both worlds?
Let's start with a quick list of ways that PHPStorm really sets itself apart for me. Please note: There are a million other features that PHPStorm uniquely offers, but to be honest, it's the tiny little conveniences that I've seen provide the biggest boost in efficiency.
Also note: This is Sublime Text 3 we're talking about.

My Must-Haves From PHPStorm 

Without most of these wonderful PHP-focused features, it'll be hard to recommend using something other than PHPStorm, even if it's slower and costlier and uses more memory. So. Can we reproduce them in Sublime Text?
  • Auto-use (import) of classes
  • Class FQCN inline completion
  • Easily navigate to a symbol's definition
  • Easy constructor injection
  • Highlight unused imports
  • Git gutters
  • Code sniffing/PSR-2 validation
  • Code Completion: PHP
  • Code Completion: project code

Package Control 

Before we talk about anything else, you at least need to know how to install packages in Sublime Text.
If you haven't yet, Go install Package Control now.
Unless otherwise specified, every package after this should be installed using Package Control.

Sublime PHP Companion 

The most significantly PHP-focused package for Sublime Text is called Sublime PHP Companion.
Like most packages, it contains a series of actions you can perform. They're mapped to certain keys by default, but you can always re-map them. Update: there is no keymapping by default anymore. Learn more about how to set up PHPCompanion keymapping here.
  • find_use (F10) - When your cursor is over a class name, this command makes it simple to use (import) that class. find_use
  • expand_fqcn (F9) - Same as find_use but instead of expanding the class in the import block, it expands its FQCN inline. expand_fqcn
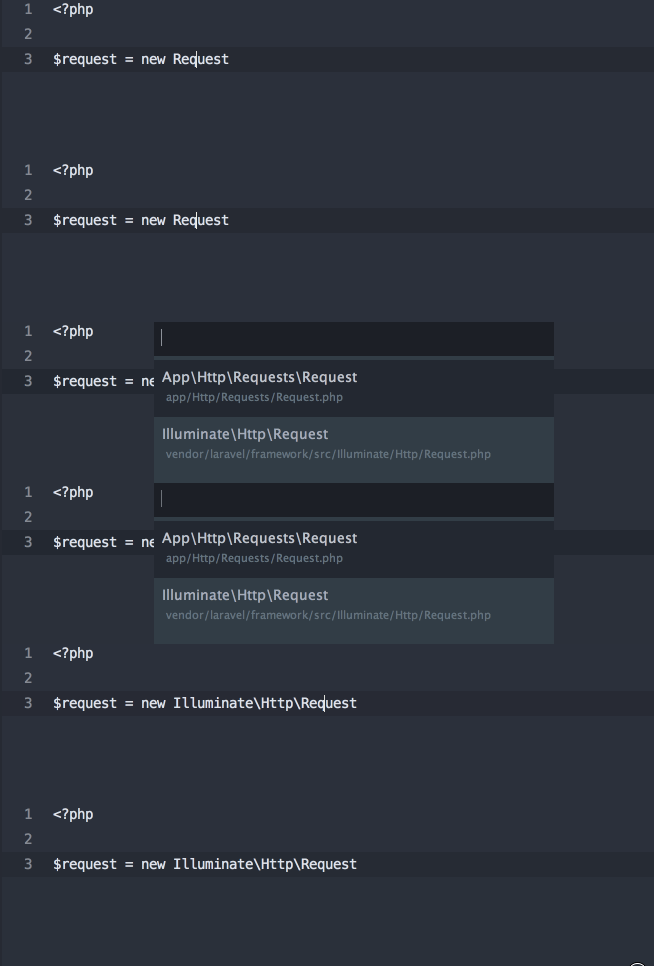
  • import_namespace (F8) - Adds the namespace for the current file based on the file's path.
  • goto_definition_scope (shift+F12) - Same as Sublime Text's native goto_definition (described below), but scoped in a PHP-aware manner.
The package isn't perfect, and it is clearly not as bright as PHPStorm is when it comes to detecting namespaces and parsing some weird edge cases. But for day-to-day work, this is a huge boost in the PHP-code-knowledge area.

AllAutocomplete

Sublime PHP Companion doesn't sniff your classes and give you autocompletion, sadly, but SublimeAllAutocomplete does register the names of all symbols (functions, classes, etc.) in any files you have open in other tabs and add those to the autocomplete register.
This isn't quite the same as full userland-code-sensitive autocompletion, but it helps a lot.
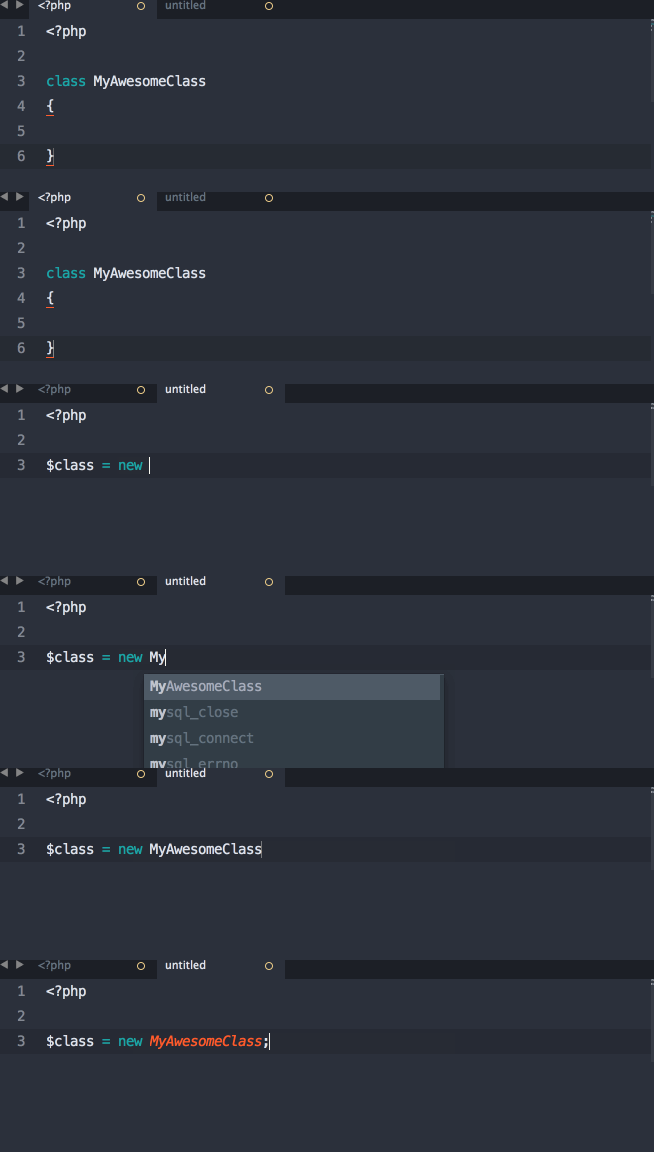
AllAutocomplete demonstration

Cmd-click for function definition 

Sublime PHP Companion makes it easy to right click on functions and go to their definitions, but this shortcut brings back PHPStorm's CMD-click-to-definition. FYI, in Sublime Text CMD (or windows' ctrl key or whatever it is on other systems) is called "Super".
First, create a user mousemap file. If you don't have one, go here:
Linux
Create Default (Linux).sublime-mousemap in ~/.config/sublime-text-3/Packages/User
Mac
Create Default (OSX).sublime-mousemap in ~/Library/Application Support/Sublime Text 3/Packages/User
Windows
Create Default (Windows).sublime-mousemap in %appdata%\Sublime Text 3\Packages\User
Next, place this in the file:
[
    {
        "button": "button1", 
        "count": 1, 
        "modifiers": ["ctrl"],
        "press_command": "drag_select",
        "command": "goto_definition"
    }
]
You just taught Sublime Text this: "when I hold ctrl and click button one, fire the goto_definition command." Done! (original source)
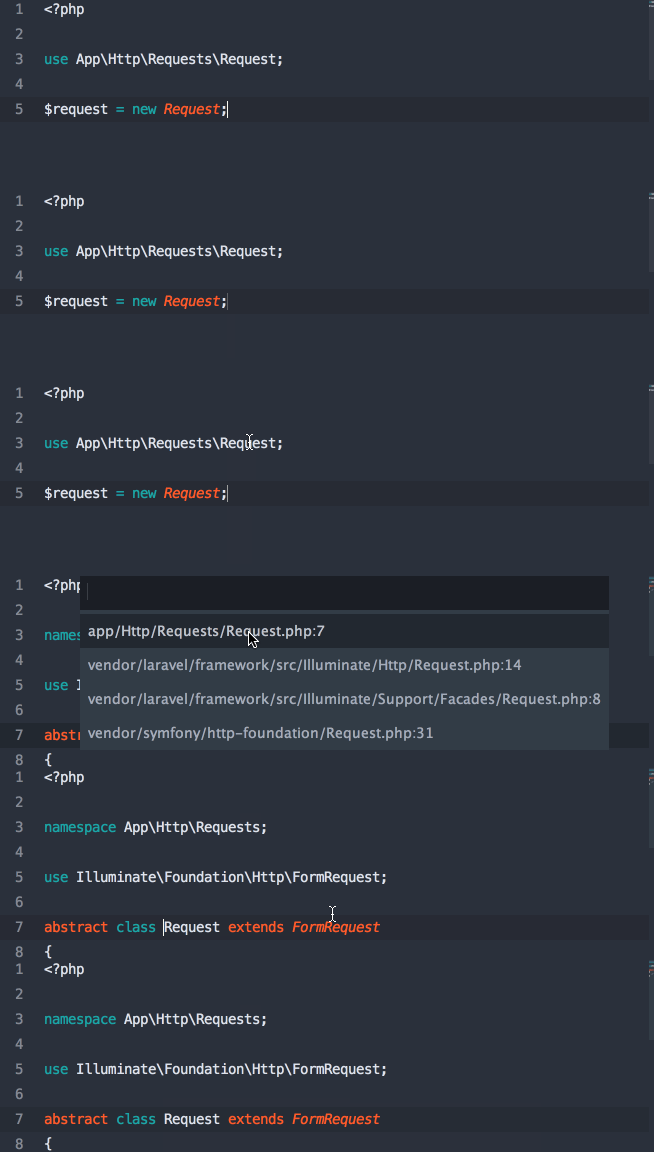
ST Click to definition
Note: I originally wanted to suggest using the super modifier, so it would be just like PHPStorm; however, that would override Sublime Text's "hold super and click to get multiple cursors" behavior, so I didn't.

Code sniffing and PHP_CodeSniffer 

Sublime PHPCS 

There's a package named Sublime PHPCS that brings PHP_CodeSniffer, PHP's linter, PHP Mess Detector, and Scheck (?) to bear on your code.
You can tweak all sorts of settings, but you're primarily either going to run it every time you save your file (good, but can get annoying), or every time you trigger it from the command palette (press super-shift-p and then type until you get "PHP Code Sniffer: Sniff this file") or keyboard shortcut (ctrl-super-shift-s by default).
You'll get gutter highlights and a list up top of all of the places your code doesn't satisfy the linter.
Note that this and any other packages that rely on code sniffing and linting will be requiring command line applications installed, so be sure to visit their sites and read their directions.

PHP_CodeSniffer Sublime Text 2/3 Plugin 

Interestingly, there's a relatively un-noticed plugin doing the same thing (but for PHPCS only) that's written by the same group that wrote PHP CodeSniffer, so it might be worth checking out as well; it's called PHP_CodeSniffer Sublime Text 2/3 Plugin (creative, I know.)
I've never used this one, though, so proceed with caution.

Mike Francis PHP CS Fixer Build Script

Mike Francis also shared a custom build script he wrote that runs PHP-CS-Fixer on your code whenever you trigger it. That means it'll actually enforce PSR-2 (or whatever other PHP-CS-Fixer standard you pass it) on your code for you.
Taylor Otwell actually shared this same script with me, but he didn't write it up as nicely as Mike did. :) He did, however, mention that you might want to set this preference: "show_panel_on_build": false, This'll keep it from popping out the command panel with your results every time, which can get very irritating very quickly.

SublimeLinter 

SublimeLinter PHP (and its required dependency, SublimeLinter) rely on PHP's built-in linter (just like the Sublime PHPCS plugin above). This is a simpler version that only runs the linter, nothing else.

DocBlockr 

If you're the type to use PHPStorm, there's a greater chance that you're the type to write Doc blocks. (Just sayin').
DocBlockr makes it simple to create new doc blocks, but more importantly, if you create a doc block just above a defined function, it will extract that function's parameter information and pre-fill it in your doc block. Boom.
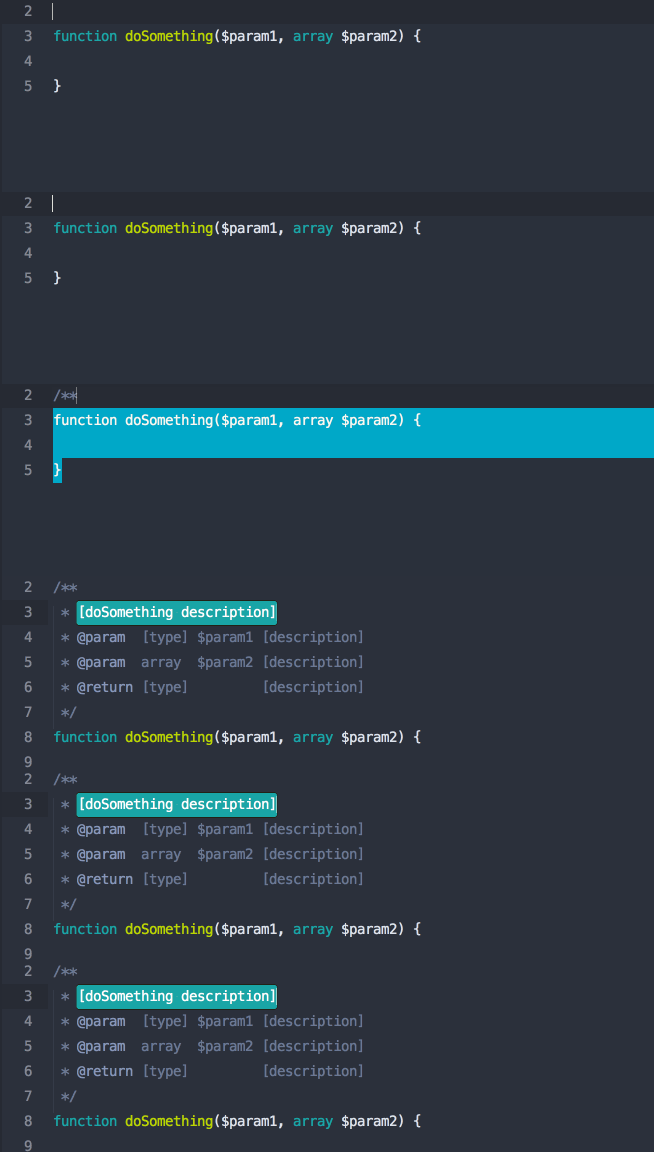
DocBlockr in action

Git helpers 

Sublime Text Git 

Are you the type that hates switching from your IDE to your terminal/Git client? Sublime Text Git provides access to many Git commands directly from the Sublime Text command palette.

GitGutter 

GitGutter shows you diff information regarding each line's status--has it been modified, inserted, or deleted?
This is not nearly as powerful as PHPStorm's Git gutters, but it's a step in the right direction.
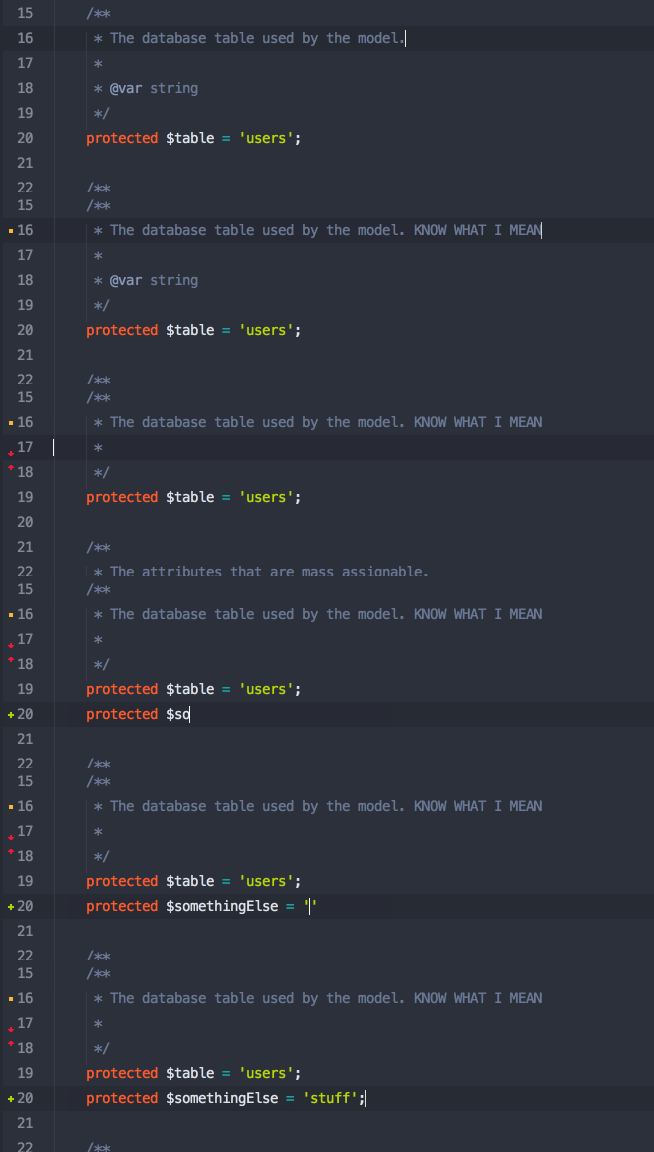
GitGutter

Syntax Highlighting

PHPUnit Build 

There's a great plugin that makes it super easy to run PHPUnit from the command palette or a keyboard shortcut: SimplePHPUnit
Just like the name implies, you install the package and you're up and running.

CodeIntel 

CodeIntel is supposed to provide Sublime Text intelligence about the language you're working in. It should provide autocompletion, easy jump-to-definition, and information about the function you're currently working in.
Why do I keep saying "should" and "supposed to"? Because I have yet to meet a PHP developer who can get CodeIntel up and running consistently and predictably. Have you? Hit me up.

Other Plugins 

When I asked around on Twitter, plenty of folks shared plugins. Since I don't use these, I can only share them vaguely, but I'm sure they're all worth a quick check.
  • ApplySyntax extends Sublime Text's ability to determine which syntax to apply to your current file
  • DashDoc makes it easy for Mac users with the Dash application to look up any word in Dash
  • Function Name Display adds information to the status bar about the current file, class, and function/method name
  • phpfmt looks like an alternative to PHP CS Fixer
  • CodeComplice is code intel, but newer—maybe this is the solution?!
  • Xdebug Client
  • EditorConfig is a standard to share particular editor configuration patterns for each project. This plugin lets you import and use them in Sublime Text. (learn more about the EditorConfig format)
  • SublimePrettyJSON is great for quickly formatting JSON
  • CaseConversion makes it simple to convert between snake_case and camelCase and PascalCase and split and join words and everything else.

CodeBug for Xdebug 

Do you miss the Xdebug integration in PHPStorm? Check out Codebug, a standalone xdebug client.
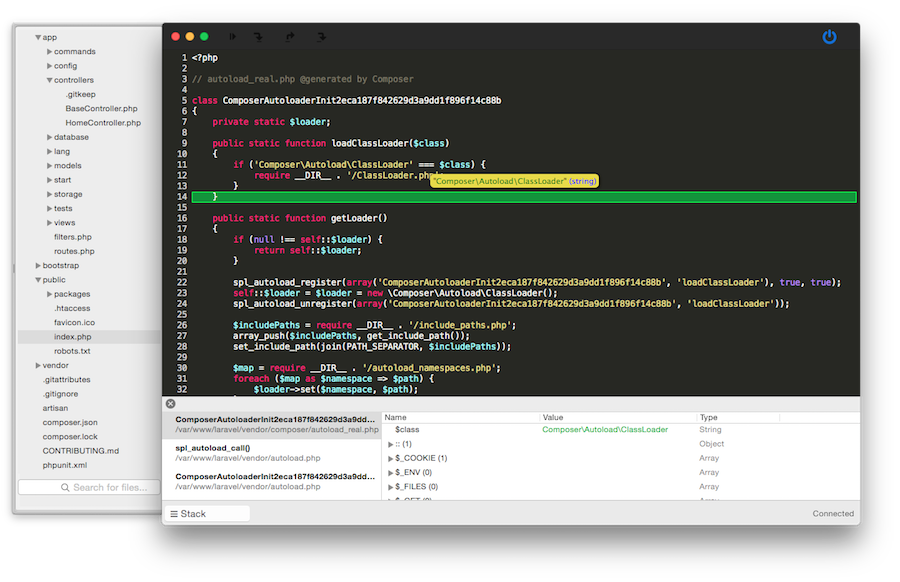
Codebug Screenshot

A Few General Sublime Text Tips 

This post is not an introduction to all things Sublime Text, but I do want to cover a few important pieces here.

Finding files with "Goto Anything" (cmd-p) 

If you press super-P you'll get the wildly powerful Goto Anything palette, which allows you to easily find files, but you can go a bit further: if you find your file (e.g. by typing Handler.php), you can also trigger opening it at a certain line (Handler.php:35) or at a certain symbol ().
Goto Anything

Finding commands with the Command Palette (cmd-shift-p) 

While the Goto Anything palette lets you search for files in your project, the Command Palette allows you to search for commands.
This means that any command that Sublime Text lets you perform (run builds, rename files, etc.), but also those from third-party packages (Sniff this file, etc.) can be run purely from the keyboard, even if you don't know (or have) the keyboard shortcut.
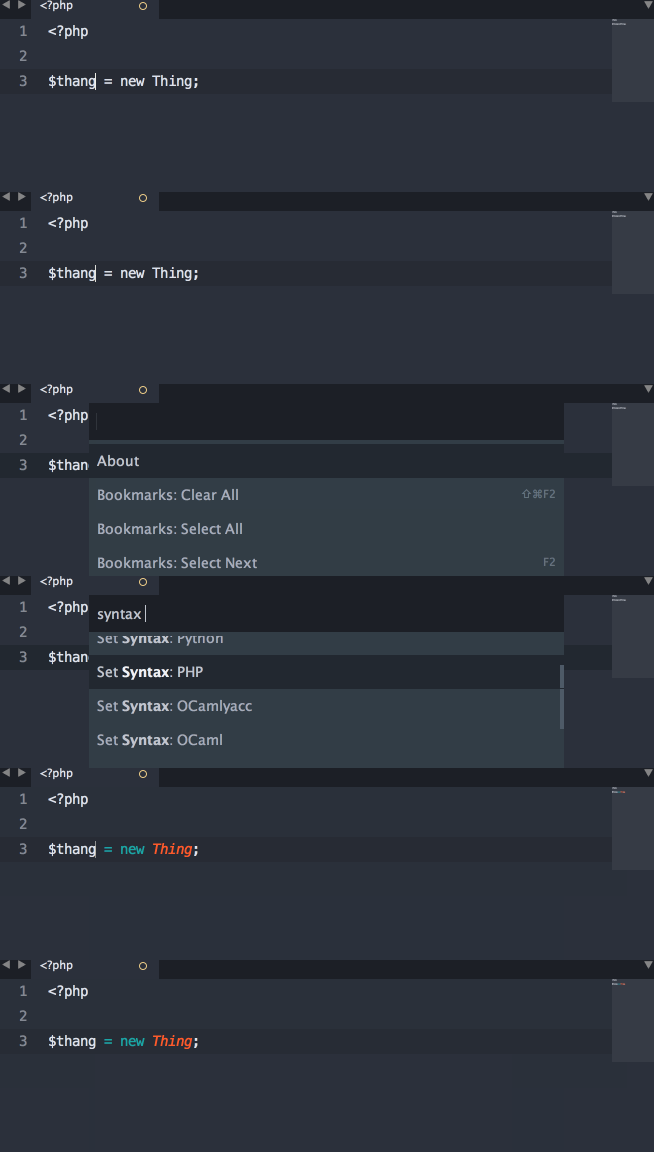
Command Palette

Finding symbols with "Goto Symbols" (cmd-r) 

If you press super-R you'll get the Goto Symbol palette, which will navigate to any symbol in your current file.
Symbols are things like classes, methods, or functions.
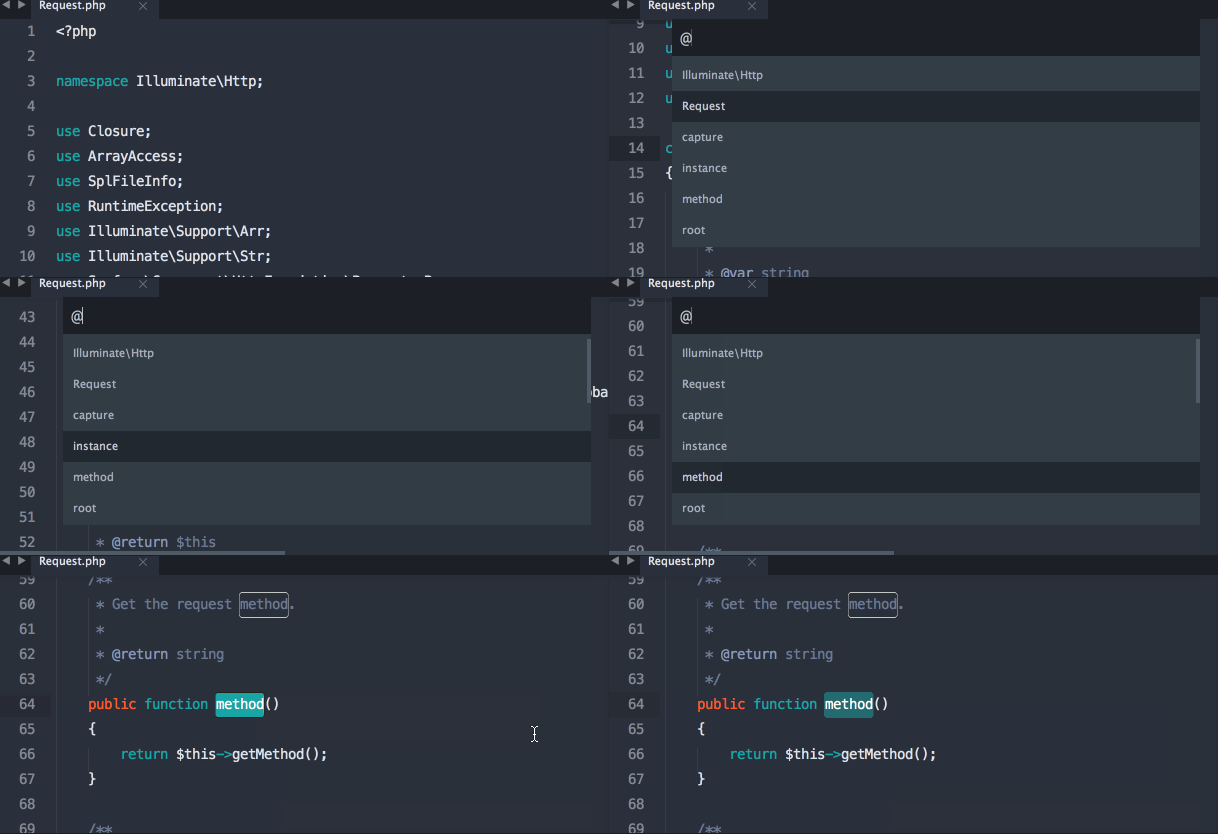
Goto Symbols

Multiple cursors 

Many editors have added multiple cursors, but Sublime Text still does it the best.
If you've never tried it, go learn about it somewhere, but here's a quick intro:
Open up a file. Hold "super" (cmd on Mac) and click several places around the file. Now start typing. BOOM.
Another great trick: Place your cursor on a common word (for example, a variable name). Now press Super-D a few times. You now have several instances of that variable selected and you can manipulate them all at once.
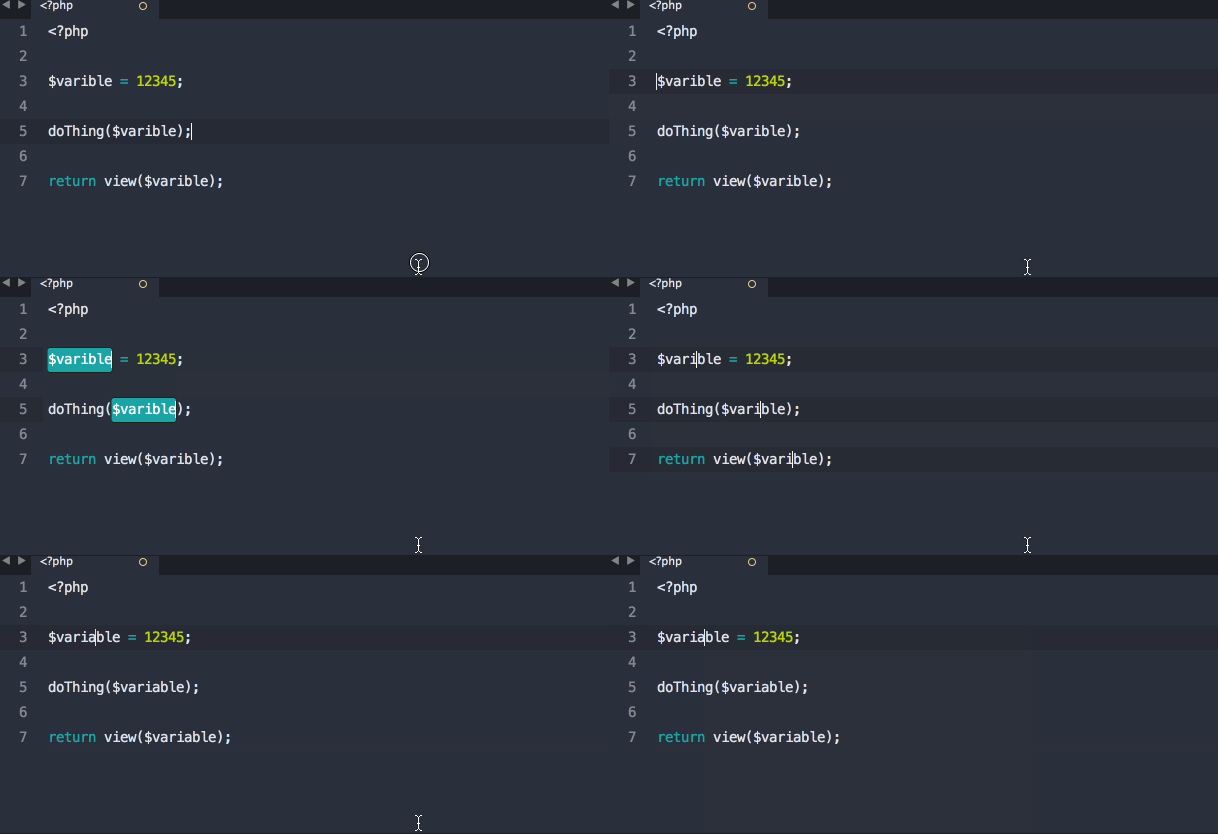
Multiple selection
Or, select five lines and press Super-shift-l. Check it.
There's a lot more you can do with this if you get creative.

Fuzzy matching 

Did you know that when you're using any of the command palettes in Sublime Text, you don't have to finish one word?
In most editors (like PHPStorm), if you wanted to find a file named resources/views/conferences/edit.blade.php, you could type resources/views/conferences/edit.blade.php or conferences/edit.blade.php, but in Sublime Text all you would need is something like resvieconedblp. Just type enough that the order of letters you're typing could only exist in the string you're looking for, and you'll be good to go. Skip a letter here, skip a slash there--no problem.
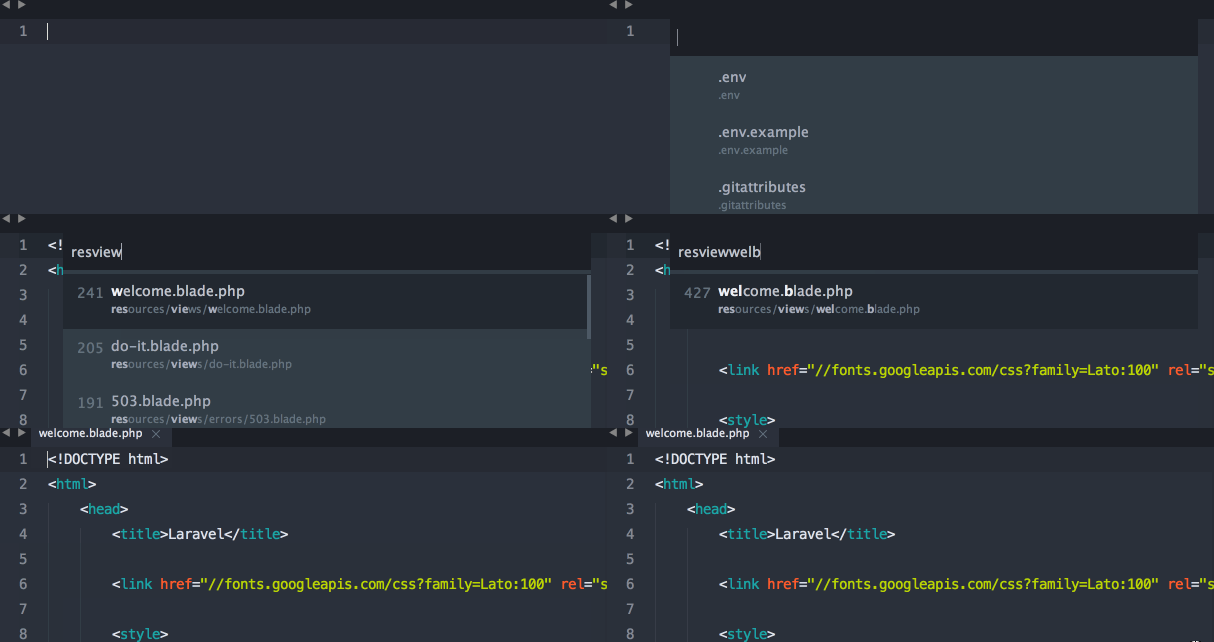
Sublime Text Fuzzy Matching

Miscellany 

There's a lot more to learn about how Sublime Text works, and a lot of tools and courses available to you. This is not a comprehensive resource for everything that's great about Sublime; those guides have already been written.
If you want to learn more about Sublime Text, there are two excellent resources I'd consider checking out.
  • Sublime Text Power User is a book and video series by my friend Wes Bos that teaches you everything you need to use Sublime Text like a boss. It's the easiest way for someone new to Sublime Text to get up and running quickly. Also, I reached out to Wes and he gave me a GEEK coupon to get you $10 off (disclaimer: it helps me out, too.)
  • ShortcutFoo is a great resource for learning keyboard shortcuts for any environment. They've got programs for everything from Vim to Sublime Text to Photoshop to Excel.

The Verdict 

Let's take a look at our list and see what we've handled:
  • Class FQCN inline completion (Sublime PHP Companion)
  • Easily navigate to a symbol's definition (Sublime PHP Companion)
  • Navigate to a symbol's definition (Sublime PHP Companion)
  • Easy constructor injection (Macro?)
  • Highlight unused imports (SublimeLinter)
  • Git gutters (GitGutter)
  • Code sniffing/PSR-2 validation (SublimePHPCS etc.)
  • Code Completion: PHP
  • Code Completion: project code
Not bad, actually. Let's talk about what's missing:
  • Construction injection (e.g. simplifying injecting a property into the constructer as a property, setting it in the constructor, and defining the class property) is something I think can be solved with a clever macro—but I haven't seen that clever macro yet.
  • CodeIntel purports to offer PHP code completion, so it's just a matter of getting that working. But I don't think (correct me if I'm wrong) anything in the Sublime Text world claims to sniff the definitions of your code and then provide autocompletion and parameter suggestion. So that's a big shortcoming for sure. Note, however: AllAutocomplete definitely relieves this pain a little.
What's my verdict? As always, it depends. I think it'll depend some on the project, some on the developer, and some on whether or not I can find solutions to some of the issues above. But I'm definitely leaning on Sublime Text a lot more than I was six months ago—it's just so darn fast.

Postscript 

Are there any Sublime Text tips for PHP developers that I missed? Let me know on Twitter.
Are there any PHPStorm features that I didn't cover here that you think are vital to every developer's toolkit? Let me know that too.
Also: I couldn't've written this without Adam Wathan, Taylor Otwell, Jeffrey Way, and many, many other friends on Twitter.
Read More

Laravel Auth Tutorial

09:42:00


Most websites will need a way to allow users to log in so that they can access resources, update information, and so on. Some frameworks like Codeigniter do not have a built in authentication system. In a scenario like that, you would have to write your own, or implement a third party solution. With Laravel, user authentication is baked right in. Let’s take a look at how we can put Laravel Auth to use!
Set Up a Demo App

The first thing we’ll do is to just set up a demo laravel application on our machine. In this case we are using windows with wamp server. I know, yell at me, throw tomatoes, do whatever you like! One day I will get my own dedicated machine with OSX and all the goodies installed. I’ll also make time to get up to speed with Homestead and Vagrant. For now, we’ll make do with our trusty setup since it is working fine, and hey, if it works – it’s good for me. First off, I’ll download the laravel.phar file from the quick start page at Laravel. We’ll put this in the www root folder. Now, we can CD into www and run php laravel.phar new authdemo

note: If your setup bugs out with something like, “The PHP cURL extension must be installed to use Guzzle“, you’ll need to make sure the line extension=php_curl.dll is uncommented in your php.ini file. Basically, remove the ; before it, save, and restart all services. Now run php laravel.phar new authdemo again and you should find that, yes we are ready for action when you see:
C:wampwww>php laravel.phar new authdemo
Crafting application…
Application ready! Build something amazing.

Nice! Go ahead and hit http://localhost/authdemo/public/ to make sure you see the familiar arrival message.
Laravel Auth
Configure The Users Table

Out of the box, Eloquent is the authentication driver for Laravel. You don’t have to use this, but then again, you’re using Laravel so let’s use the defaults. You’ll find this in the auth.php file located in the app/config folder.

Let’s create a table to work with using Jeffrey Ways Generator package. Don’t forget to add it to your composer.json file as well as the app/config/app.php file in the service providers array. This is the entry to add to the array 'WayGeneratorsGeneratorsServiceProvider'

Your composer.json might look something like:

{
    "name": "laravel/laravel",
    "description": "The Laravel Framework.",
    "keywords": ["framework", "laravel"],
    "license": "MIT",
    "require": {
        "laravel/framework": "4.2.*",
         "way/generators": "dev-master"
    },
    "autoload": {
        "classmap": [
            "app/commands",
            "app/controllers",
            "app/models",
            "app/database/migrations",
            "app/database/seeds",
            "app/tests/TestCase.php"
        ]
    },
    "scripts": {
        "post-install-cmd": [
            "php artisan clear-compiled",
            "php artisan optimize"
        ],
        "post-update-cmd": [
            "php artisan clear-compiled",
            "php artisan optimize"
        ],
        "post-create-project-cmd": [
            "php artisan key:generate"
        ]
    },
    "config": {
        "preferred-install": "dist"
    },
    "minimum-stability": "stable"
}

   
{
    "name": "laravel/laravel",
    "description": "The Laravel Framework.",
    "keywords": ["framework", "laravel"],
    "license": "MIT",
    "require": {
        "laravel/framework": "4.2.*",
         "way/generators": "dev-master"
    },
    "autoload": {
        "classmap": [
            "app/commands",
            "app/controllers",
            "app/models",
            "app/database/migrations",
            "app/database/seeds",
            "app/tests/TestCase.php"
        ]
    },
    "scripts": {
        "post-install-cmd": [
            "php artisan clear-compiled",
            "php artisan optimize"
        ],
        "post-update-cmd": [
            "php artisan clear-compiled",
            "php artisan optimize"
        ],
        "post-create-project-cmd": [
            "php artisan key:generate"
        ]
    },
    "config": {
        "preferred-install": "dist"
    },
    "minimum-stability": "stable"
}

Once all this is complete run composer update, then run php artisan generate:migration create_users_table --fields="username:string, email:string:unique, password:string"

Before we forget, lets make sure our database connections are configured in app/config/database.php. Since we are rebels in the local environment, we’re just going to use root with no password

PHP
        'mysql' => array(
            'driver'    => 'mysql',
            'host'      => 'localhost',
            'database'  => 'authdemo',
            'username'  => 'root',
            'password'  => '',
            'charset'   => 'utf8',
            'collation' => 'utf8_unicode_ci',
            'prefix'    => '',
        )

   
        'mysql' => array(
            'driver'    => 'mysql',
            'host'      => 'localhost',
            'database'  => 'authdemo',
            'username'  => 'root',
            'password'  => '',
            'charset'   => 'utf8',
            'collation' => 'utf8_unicode_ci',
            'prefix'    => '',
        )

While we’re at it, let’s have a look at the migration which was created for us by using the generate command.

PHP
<?php

use IlluminateDatabaseMigrationsMigration;
use IlluminateDatabaseSchemaBlueprint;

class CreateUsersTable extends Migration {

    /**
     * Run the migrations.
     *
     * @return void
     */
    public function up()
    {
        Schema::create('users', function(Blueprint $table)
        {
            $table->increments('id');
            $table->string('username');
            $table->string('email')->unique();
            $table->string('password');
            $table->timestamps();
        });
    }


    /**
     * Reverse the migrations.
     *
     * @return void
     */
    public function down()
    {
        Schema::drop('users');
    }

}

   
<?php

use IlluminateDatabaseMigrationsMigration;
use IlluminateDatabaseSchemaBlueprint;

class CreateUsersTable extends Migration {

    /**
     * Run the migrations.
     *
     * @return void
     */
    public function up()
    {
        Schema::create('users', function(Blueprint $table)
        {
            $table->increments('id');
            $table->string('username');
            $table->string('email')->unique();
            $table->string('password');
            $table->timestamps();
        });
    }


    /**
     * Reverse the migrations.
     *
     * @return void
     */
    public function down()
    {
        Schema::drop('users');
    }

}

Looks good to me! php artisan migrate

Oh wow, this is new! Jeff must have updated his generators package, I don’t remember the nice alert – nice touch.
**************************************
* Application In Production! *
**************************************

Do you really wish to run this command? y
Migration table created successfully.
Migrated: 2014_07_14_210221_create_users_table

We simply choose y and proceed to complete the process like you see above.
Populate the Users Table

Now that we have set up some important boilerplate type code, we can populate the table with some data. Now here is something really cool – the php artisan tinker command! You can invoke this process from the command line and use it to hook into the Laravel Application to run simple scripts using Laravel. Instead of creating a new php file, saving, then running in your browser – you can simply use php artisan tinker to bang out some quick logic.

php artisan tinker
Full REPL not supported. Falling back to simple shell.
>$user = new User;
>$user->username = ‘Vegibit’;
>$user->email = ‘vegibit@example.com’;
>$user->password = Hash::make(‘haha’);
>$user->save();
>^C

It looks like we ran into a little hiccup. It turns out the latest version of Laravel uses the Boris repo to power tinker. This requires the pcntl functions which need a *nix system. The tinker command does fall back to the 4.0 version, so it appears some things will still work. After completing the above code, we do see that our database became populated – so it looks like at least this snippet did work!

laravel artisan tinker

Onward! Ok, now that we have a user in the Users table, we’re going to need a form to allow someone to log in. We can use a route resource to accomplish this goal. Let’s set up the routes file like so:

PHP
<?php

/*
|--------------------------------------------------------------------------
| Application Routes
|--------------------------------------------------------------------------
|
| Here is where you can register all of the routes for an application.
| It's a breeze. Simply tell Laravel the URIs it should respond to
| and give it the Closure to execute when that URI is requested.
|
*/

Route::get('login', 'SessionsController@create');
Route::get('logout', 'SessionsController@destroy');
Route::resource('sessions', 'SessionsController');

   
<?php

/*
|--------------------------------------------------------------------------
| Application Routes
|--------------------------------------------------------------------------
|
| Here is where you can register all of the routes for an application.
| It's a breeze. Simply tell Laravel the URIs it should respond to
| and give it the Closure to execute when that URI is requested.
|
*/

Route::get('login', 'SessionsController@create');
Route::get('logout', 'SessionsController@destroy');
Route::resource('sessions', 'SessionsController');

We can view our routes using php artisan routes
+--------+-----------------------------------+------------------+----------------------------+----------------+---------------+
| Domain | URI                               | Name             | Action                     | Before Filters | After Filters |
+--------+-----------------------------------+------------------+----------------------------+----------------+---------------+
|        | GET|HEAD login                    |                  | SessionsController@create  |                |               |
|        | GET|HEAD logout                   |                  | SessionsController@destroy |                |               |
|        | GET|HEAD sessions                 | sessions.index   | SessionsController@index   |                |               |
|        | GET|HEAD sessions/create          | sessions.create  | SessionsController@create  |                |               |
|        | POST sessions                     | sessions.store   | SessionsController@store   |                |               |
|        | GET|HEAD sessions/{sessions}      | sessions.show    | SessionsController@show    |                |               |
|        | GET|HEAD sessions/{sessions}/edit | sessions.edit    | SessionsController@edit    |                |               |
|        | PUT sessions/{sessions}           | sessions.update  | SessionsController@update  |                |               |
|        | PATCH sessions/{sessions}         |                  | SessionsController@update  |                |               |
|        | DELETE sessions/{sessions}        | sessions.destroy | SessionsController@destroy |                |               |
+--------+-----------------------------------+------------------+----------------------------+----------------+---------------+

   
+--------+-----------------------------------+------------------+----------------------------+----------------+---------------+
| Domain | URI                               | Name             | Action                     | Before Filters | After Filters |
+--------+-----------------------------------+------------------+----------------------------+----------------+---------------+
|        | GET|HEAD login                    |                  | SessionsController@create  |                |               |
|        | GET|HEAD logout                   |                  | SessionsController@destroy |                |               |
|        | GET|HEAD sessions                 | sessions.index   | SessionsController@index   |                |               |
|        | GET|HEAD sessions/create          | sessions.create  | SessionsController@create  |                |               |
|        | POST sessions                     | sessions.store   | SessionsController@store   |                |               |
|        | GET|HEAD sessions/{sessions}      | sessions.show    | SessionsController@show    |                |               |
|        | GET|HEAD sessions/{sessions}/edit | sessions.edit    | SessionsController@edit    |                |               |
|        | PUT sessions/{sessions}           | sessions.update  | SessionsController@update  |                |               |
|        | PATCH sessions/{sessions}         |                  | SessionsController@update  |                |               |
|        | DELETE sessions/{sessions}        | sessions.destroy | SessionsController@destroy |                |               |
+--------+-----------------------------------+------------------+----------------------------+----------------+---------------+

We can now generate a controller that will handle all the routes we just set up using php artisan generate:controller SessionsController

Friendly Alert! In this episode we are using the RESTful development style. If the routes above look like a foreign language, check out our episode on RESTful Controllers and you’ll be good to go.

Here is our new controller in all of its glory:

PHP
<?php

class SessionsController extends BaseController {

    /**
     * Display a listing of the resource.
     * GET /sessions
     *
     * @return Response
     */
    public function index()
    {
        //
    }

    /**
     * Show the form for creating a new resource.
     * GET /sessions/create
     *
     * @return Response
     */
    public function create()
    {
        return View::make('sessions.create');
    }

    /**
     * Store a newly created resource in storage.
     * POST /sessions
     *
     * @return Response
     */
    public function store()
    {
        //
    }

    /**
     * Display the specified resource.
     * GET /sessions/{id}
     *
     * @param  int  $id
     * @return Response
     */
    public function show($id)
    {
        //
    }

    /**
     * Show the form for editing the specified resource.
     * GET /sessions/{id}/edit
     *
     * @param  int  $id
     * @return Response
     */
    public function edit($id)
    {
        //
    }

    /**
     * Update the specified resource in storage.
     * PUT /sessions/{id}
     *
     * @param  int  $id
     * @return Response
     */
    public function update($id)
    {
        //
    }

    /**
     * Remove the specified resource from storage.
     * DELETE /sessions/{id}
     *
     * @param  int  $id
     * @return Response
     */
    public function destroy($id)
    {
        //
    }

}

   
<?php

class SessionsController extends BaseController {

    /**
     * Display a listing of the resource.
     * GET /sessions
     *
     * @return Response
     */
    public function index()
    {
        //
    }

    /**
     * Show the form for creating a new resource.
     * GET /sessions/create
     *
     * @return Response
     */
    public function create()
    {
        return View::make('sessions.create');
    }

    /**
     * Store a newly created resource in storage.
     * POST /sessions
     *
     * @return Response
     */
    public function store()
    {
        //
    }

    /**
     * Display the specified resource.
     * GET /sessions/{id}
     *
     * @param  int  $id
     * @return Response
     */
    public function show($id)
    {
        //
    }

    /**
     * Show the form for editing the specified resource.
     * GET /sessions/{id}/edit
     *
     * @param  int  $id
     * @return Response
     */
    public function edit($id)
    {
        //
    }

    /**
     * Update the specified resource in storage.
     * PUT /sessions/{id}
     *
     * @param  int  $id
     * @return Response
     */
    public function update($id)
    {
        //
    }

    /**
     * Remove the specified resource from storage.
     * DELETE /sessions/{id}
     *
     * @param  int  $id
     * @return Response
     */
    public function destroy($id)
    {
        //
    }

}

We’ll populate the create method like so:

PHP
    public function create()
    {
        return View::make('sessions.create');
    }

   
    public function create()
    {
        return View::make('sessions.create');
    }

Now we need to create the actual form to handle this. We’ll create a master page and embed bootstrap so things look better than bare html. Here is a starting point for the master page and the form. With the laravel form class, you can specify classes to add via an array. For any html elements that laravel is generating for the form, we will add the class using the array. Any other elements we’ll just add the class in the view file.
default.blade.php

XHTML
<!doctype html>
<html>
<head>
<meta charset="utf-8">
<title>Laravel Auth Tutorial</title>
<!-- Latest compiled and minified CSS -->
<link rel="stylesheet" href="//maxcdn.bootstrapcdn.com/bootstrap/3.2.0/css/bootstrap.min.css">

<!-- Optional theme -->
<link rel="stylesheet" href="//maxcdn.bootstrapcdn.com/bootstrap/3.2.0/css/bootstrap-theme.min.css">

<!-- Latest compiled and minified JavaScript -->
<script src="//maxcdn.bootstrapcdn.com/bootstrap/3.2.0/js/bootstrap.min.js"></script>
</head>

<body>
<div class="container">
  <div>
    <h1>Laravel Auth Tutorial</h1>
  </div>

@yield('content')

</div>
</body>

</html>

   
<!doctype html>
<html>
<head>
<meta charset="utf-8">
<title>Laravel Auth Tutorial</title>
<!-- Latest compiled and minified CSS -->
<link rel="stylesheet" href="//maxcdn.bootstrapcdn.com/bootstrap/3.2.0/css/bootstrap.min.css">

<!-- Optional theme -->
<link rel="stylesheet" href="//maxcdn.bootstrapcdn.com/bootstrap/3.2.0/css/bootstrap-theme.min.css">

<!-- Latest compiled and minified JavaScript -->
<script src="//maxcdn.bootstrapcdn.com/bootstrap/3.2.0/js/bootstrap.min.js"></script>
</head>

<body>
<div class="container">
  <div>
    <h1>Laravel Auth Tutorial</h1>
  </div>

@yield('content')

</div>
</body>

</html>

create.blade.php

XHTML
@extends('layouts.default')

@section('content')
{{ Form::open(array('route' => 'sessions.store', 'class'=>'form-horizontal' )) }}

<div class="form-group">
<div class="col-lg-1">
{{ Form::label('email', 'Email:') }}
</div>

<div class="col-lg-7">
{{ Form::text('email', '', array('class' => 'form-control')) }}
</div>
</div>

<div class="form-group">
<div class="col-lg-1">
{{ Form::label('password', 'Password:') }}
</div>

<div class="col-lg-7">
{{ Form::password('password', array('class' => 'form-control')) }}
</div>
</div>

<div class="form-group">
<div class="col-lg-8">
{{ Form::submit('Login', array('class' => 'btn btn-lg btn-info btn-block')) }}
</div>
</div>

{{ Form::close() }}
@stop

   
@extends('layouts.default')

@section('content')
{{ Form::open(array('route' => 'sessions.store', 'class'=>'form-horizontal' )) }}

<div class="form-group">
<div class="col-lg-1">
{{ Form::label('email', 'Email:') }}
</div>

<div class="col-lg-7">
{{ Form::text('email', '', array('class' => 'form-control')) }}
</div>
</div>

<div class="form-group">
<div class="col-lg-1">
{{ Form::label('password', 'Password:') }}
</div>

<div class="col-lg-7">
{{ Form::password('password', array('class' => 'form-control')) }}
</div>
</div>

<div class="form-group">
<div class="col-lg-8">
{{ Form::submit('Login', array('class' => 'btn btn-lg btn-info btn-block')) }}
</div>
</div>

{{ Form::close() }}
@stop

Cool! Let’s go ahead and load up http://localhost/authdemo/public/login to see how things are coming along:
laravel auth login

Shweet!
Update SessionsController

So we have a form going, and things look to be routing properly. We’ll now need to update the SessionsController so that the store method will handle a login once a user fills out the form and clicks login. We’ll set up some logic so that both the login and logout routes will handle their requests when visited. Another thing to note, we are going to need to update our migrations to include $table->text('remember_token')->nullable();, otherwise the Redirect::to(); after the Auth::logout(); will fail as I found out 🙂

This seemed to work, your mileage may vary:
run php artisan migrate:make users_add_remembertoken

Add this code to your new migration file:

PHP
<?php

use IlluminateDatabaseSchemaBlueprint;
use IlluminateDatabaseMigrationsMigration;

class UsersAddRemembertoken extends Migration {

    /**
     * Run the migrations.
     *
     * @return void
     */
    public function up()
    {
        Schema::table("users", function($table) {
           
            $table->text('remember_token')->nullable();
           
        });
    }

    /**
     * Reverse the migrations.
     *
     * @return void
     */
    public function down()
    {
        //
    }

}

   
<?php

use IlluminateDatabaseSchemaBlueprint;
use IlluminateDatabaseMigrationsMigration;

class UsersAddRemembertoken extends Migration {

    /**
     * Run the migrations.
     *
     * @return void
     */
    public function up()
    {
        Schema::table("users", function($table) {
           
            $table->text('remember_token')->nullable();
           
        });
    }

    /**
     * Reverse the migrations.
     *
     * @return void
     */
    public function down()
    {
        //
    }

}

run php artisan migrate

If you still have troubles, update your User.php model like so:

PHP
<?php

use IlluminateAuthUserTrait;
use IlluminateAuthUserInterface;
use IlluminateAuthRemindersRemindableTrait;
use IlluminateAuthRemindersRemindableInterface;

class User extends Eloquent implements UserInterface, RemindableInterface {

    use UserTrait, RemindableTrait;

    /**
     * The database table used by the model.
     *
     * @var string
     */
    protected $table = 'users';

    /**
     * The attributes excluded from the model's JSON form.
     *
     * @var array
     */
    protected $hidden = array('password', 'remember_token');
   
    public function getRememberToken()
    {
        return $this->remember_token;
    }
   
    public function setRememberToken($value)
    {
        $this->remember_token = $value;
    }
   
    public function getRememberTokenName()
    {
        return 'remember_token';
    }

}

   
<?php

use IlluminateAuthUserTrait;
use IlluminateAuthUserInterface;
use IlluminateAuthRemindersRemindableTrait;
use IlluminateAuthRemindersRemindableInterface;

class User extends Eloquent implements UserInterface, RemindableInterface {

    use UserTrait, RemindableTrait;

    /**
     * The database table used by the model.
     *
     * @var string
     */
    protected $table = 'users';

    /**
     * The attributes excluded from the model's JSON form.
     *
     * @var array
     */
    protected $hidden = array('password', 'remember_token');
   
    public function getRememberToken()
    {
        return $this->remember_token;
    }
   
    public function setRememberToken($value)
    {
        $this->remember_token = $value;
    }
   
    public function getRememberTokenName()
    {
        return 'remember_token';
    }

}

We can now update the store and destroy methods like so:
store()

PHP
    public function store()
    {
        $input = Input::all();

        $attempt = Auth::attempt( array('email' => $input['email'], 'password' => $input['password']) );
       
        if($attempt) {
            return Redirect::to('user');
        } else {
            return Redirect::to('login');
        }
    }

   
    public function store()
    {
        $input = Input::all();

        $attempt = Auth::attempt( array('email' => $input['email'], 'password' => $input['password']) );
       
        if($attempt) {
            return Redirect::to('user');
        } else {
            return Redirect::to('login');
        }
    }

destroy()

PHP
    public function destroy()
    {
        Auth::logout();
        Session::flush();
        return Redirect::to('login');
       
    }

   
    public function destroy()
    {
        Auth::logout();
        Session::flush();
        return Redirect::to('login');
       
    }

We won’t do anything too fancy, if the user is logged out, we’re just going to send her back to the login form. You could do all kinds of nice things with custom views for different scenarios and so on, but we just want to see the authentication login and logout functionality of laravel at work here. We’ll set up a user view and update the routes file now.
user.blade.php

XHTML
@extends('layouts.default')

@section('content')
<div class="col-lg-8">
<h4 class="alert alert-success">Hi there friend! Thanks for registering your email of  {{ Auth::user()->email }} </h4>
</div>
@stop
   
@extends('layouts.default')

@section('content')
<div class="col-lg-8">
<h4 class="alert alert-success">Hi there friend! Thanks for registering your email of  {{ Auth::user()->email }} </h4>
</div>
@stop

updated routes.php

PHP
<?php

/*
|--------------------------------------------------------------------------
| Application Routes
|--------------------------------------------------------------------------
|
| Here is where you can register all of the routes for an application.
| It's a breeze. Simply tell Laravel the URIs it should respond to
| and give it the Closure to execute when that URI is requested.
|
*/

Route::get('user', function() {
    return View::make('sessions/user');
})->before('auth');

Route::get('login', 'SessionsController@create');
Route::get('logout', 'SessionsController@destroy');
Route::resource('sessions', 'SessionsController');

<?php

/*
|--------------------------------------------------------------------------
| Application Routes
|--------------------------------------------------------------------------
|
| Here is where you can register all of the routes for an application.
| It's a breeze. Simply tell Laravel the URIs it should respond to
| and give it the Closure to execute when that URI is requested.
|
*/

Route::get('user', function() {
    return View::make('sessions/user');
})->before('auth');

Route::get('login', 'SessionsController@create');
Route::get('logout', 'SessionsController@destroy');
Route::resource('sessions', 'SessionsController');

Ok, pretty standard stuff. You’ll note that we do make use of ->before(‘auth’); and all this does is tell laravel, if a user tries to hit the user route, send them packing if they’re not logged in. We’re ready for action.

First we’ll visit http://localhost/authdemo/public/login and fill in our information to login.
laravel auth login
Now we are redirected to http://localhost/authdemo/public/user, looks great!
laravel auth login success

Finally, we’ll visit http://localhost/authdemo/public/logout which will log us out and redirect us right back to the login form like so.
laravel auth login


Fantastic work y’all!! We now have a working demo of authentication in laravel! We covered many of the key topics and commands in dealing with setting up authentication in laravel such as php artisan generate:migration, php artisan migrate, php artisan tinker, php artisan routes, php artisan generate:controller, Input::all();, Auth::attempt();, Auth::logout();, Redirect::to(); and Session::flush();

Read More

Laravel Eloquent ORM Tutorial

09:33:00


Eloquent is the very powerful and expressive ORM or Object Relational Mapper in Laravel. If you know how to work with Objects in PHP, then you know how to use Eloquent! Well, it’s not *quite* that simple, but we do have the most expressive syntax yet in PHP for working with Models by way of Eloquent. Eloquent is a massive topic, and to be fair, we should probably be going over some building blocks leading up to Eloquent, however, that is not how we roll in the good ol US of A. We’re going to jump in head first, hopefully we’ll swim!

note: In Laravel, sets that are returned as a result of an eloquent query return a collection. You can learn all about Laravel Collections over at our lengthy tutorial.
Database Table to Eloquent Model Mapping

In Laravel, each Eloquent model represents a single database table. It is important to note however, that even though a single Model maps to a single Table, we will most often be using combinations of Models in retrieving say an article, or a task, or a blog post. By way of relationships, we can query several tables to get the desired result.
From DB class to Eloquent

In the last tutorial, we covered how to do basic CRUD with Laravel by using the DB class right out of the box. Now remember, we didn’t even create any Models for that, the functionality was there right out of the box. Quite impressive! Moving on, we can now define some Models and this will be by Extending Eloquent.
Let’s build our first Eloquent Model!

We’re going to be dealing with Painters and Paintings, so we’ll create our Painter model first, but before we create our models, let’s set up our database tables with migrations like you see here:

PHP
<?php
//  painters table

use IlluminateDatabaseSchemaBlueprint;
use IlluminateDatabaseMigrationsMigration;

class CreatePaintersTable extends Migration {

    /**
     * Run the migrations.
     *
     * @return void
     */
    public function up()
    {
        Schema::create('painters', function(Blueprint $table)
        {
            $table->increments('id');
            $table->string('username')->unique();
            $table->text('bio');
            $table->timestamps();
        });
    }

    /**
     * Reverse the migrations.
     *
     * @return void
     */
    public function down()
    {
        Schema::drop('painters');
    }

}

<?php
//  paintings table

use IlluminateDatabaseSchemaBlueprint;
use IlluminateDatabaseMigrationsMigration;

class CreatePaintingsTable extends Migration {

    /**
     * Run the migrations.
     *
     * @return void
     */
    public function up()
    {
        Schema::create('paintings', function(Blueprint $table)
        {
            $table->increments('id');
            $table->string('title');
            $table->text('body');
            $table->integer('painter_id');
            $table->timestamps();
        });
    }

    /**
     * Reverse the migrations.
     *
     * @return void
     */
    public function down()
    {
        Schema::drop('paintings');
    }

}

   
<?php
//  painters table

use IlluminateDatabaseSchemaBlueprint;
use IlluminateDatabaseMigrationsMigration;

class CreatePaintersTable extends Migration {

    /**
     * Run the migrations.
     *
     * @return void
     */
    public function up()
    {
        Schema::create('painters', function(Blueprint $table)
        {
            $table->increments('id');
            $table->string('username')->unique();
            $table->text('bio');
            $table->timestamps();
        });
    }

    /**
     * Reverse the migrations.
     *
     * @return void
     */
    public function down()
    {
        Schema::drop('painters');
    }

}

<?php
//  paintings table

use IlluminateDatabaseSchemaBlueprint;
use IlluminateDatabaseMigrationsMigration;

class CreatePaintingsTable extends Migration {

    /**
     * Run the migrations.
     *
     * @return void
     */
    public function up()
    {
        Schema::create('paintings', function(Blueprint $table)
        {
            $table->increments('id');
            $table->string('title');
            $table->text('body');
            $table->integer('painter_id');
            $table->timestamps();
        });
    }

    /**
     * Reverse the migrations.
     *
     * @return void
     */
    public function down()
    {
        Schema::drop('paintings');
    }

}

Let’s run our migrations using php artisan migrate.

Awesome! Now we can create a Model and populate some data into our database. The following snippet will create a Painter Model which will map to the painters database table:

PHP
class Painter extends Eloquent {}
1
   
class Painter extends Eloquent {}

Ok we have our Eloquent Model created, yes I know it was painful how much we had to type! Let’s see what that one little line of code buys us by using reflection to inspect our newly created object!

PHP
Route::get('/', function()
{

$reflection = new ReflectionClass('Painter');  //  inspect the methods and constants of any class!

print_r($reflection->getMethods());
   
});

   
Route::get('/', function()
{

$reflection = new ReflectionClass('Painter');  //  inspect the methods and constants of any class!

print_r($reflection->getMethods());
   
});

The above code will output the 164 methods you find at Laravel Eloquent API – This is a bit overwhelming! But as they say, CALM YOURSELF GRASSHOPPER! We’re only going to look at a few of them to get us started. Since we already covered how to set up CRUD In Laravel 4 with the DB class, why don’t we now whip up some CRUD with Eloquent. Since we’re learning we will use:

PHP
//  listen to the queries and output them to learn!
Event::listen('illuminate.query', function($sql) {
    var_dump($sql);
});

   
//  listen to the queries and output them to learn!
Event::listen('illuminate.query', function($sql) {
    var_dump($sql);
});

This will allow us to view all queries that Laravel creates for us! This helps us put it all together.
Create

save() We can insert new records into the database a few ways in Eloquent, but my favorite syntax is here using the save method:

PHP
Route::get('/', function()
{
    $painter = new Painter; 
    $painter->username = 'Leonardo Da Vinci';
    $painter->bio = 'Renaissance painter, scientist, inventor, and more. Da Vinci is one of most famous painters for his iconic Mona Lisa and Last Supper.';
    $painter->save();   
});

   
Route::get('/', function()
{
    $painter = new Painter; 
    $painter->username = 'Leonardo Da Vinci';
    $painter->bio = 'Renaissance painter, scientist, inventor, and more. Da Vinci is one of most famous painters for his iconic Mona Lisa and Last Supper.';
    $painter->save();   
});

string ‘insert into painters (username, bio, updated_at, created_at) values (?, ?, ?, ?)’ (length=90)
Retrieve (Select)

all() and first() Let’s have a look at our newly created record by selecting data now:
PHP
Route::get('/', function()
{
    $painters = Painter::all()->first();

    echo $painters->username.'<br>';
    echo $painters->bio;
   
});

   
Route::get('/', function()
{
    $painters = Painter::all()->first();

    echo $painters->username.'<br>';
    echo $painters->bio;
   
});

string ‘select * from painters‘ (length=24)

Leonardo Da Vinci
Renaissance painter, scientist, inventor, and more. Da Vinci is one of most famous painters for his iconic Mona Lisa and Last Supper.
Update

Let’s move on to an update. I think we’ll add a hypen in the last name. Note that there is not a specific update method per se, but rather we retrieve it, change an attribute, and use the save method like so:

PHP
Route::get('/', function()
{
    $painters = Painter::all()->first();
    $painters->username = 'Leonardo Da-Vinci';
    $painters->save();   
});

   
Route::get('/', function()
{
    $painters = Painter::all()->first();
    $painters->username = 'Leonardo Da-Vinci';
    $painters->save();   
});

string ‘select * from painters‘ (length=24)
string ‘update painters set username = ?, updated_at = ? where id = ?’ (length=69)
Delete

delete With eloquent, deleting a record is super easy. Have a look:

PHP
Route::get('/', function()
{
    $painters = Painter::all()->first();
    $painters->delete();   
});

   
Route::get('/', function()
{
    $painters = Painter::all()->first();
    $painters->delete();   
});

string ‘select * from painters‘ (length=24)
string ‘delete from painters where id = ?’ (length=37)

and just like that, POOF!, Leonardo is no longer with us in the database.
Relationships in Eloquent

Relationships are a key component in Eloquent but first, we need some more painters! Let’s add them:

PHP
Route::get('/', function()
{
    $painter = new Painter; 
    $painter->username = 'Leonardo Da Vinci';
    $painter->bio = 'Renaissance painter, scientist, inventor, and more. Da Vinci is one of most famous painters for his iconic Mona Lisa and Last Supper.';
    $painter->save();   

    $painter = new Painter; 
    $painter->username = 'Vincent Van Gogh';
    $painter->bio = 'Dutch post-impressionist painter. Famous paintings include: Sunflowers, The Starry night, Cafe Terrace at Night.';
    $painter->save();   

    $painter = new Painter; 
    $painter->username = 'Rembrandt';
    $painter->bio = 'One of greatest painters, admired for his vivid realism. Famous paintings include The Jewish Bride, The Storm of the sea of Galilee';
    $painter->save();   
});

   
Route::get('/', function()
{
    $painter = new Painter; 
    $painter->username = 'Leonardo Da Vinci';
    $painter->bio = 'Renaissance painter, scientist, inventor, and more. Da Vinci is one of most famous painters for his iconic Mona Lisa and Last Supper.';
    $painter->save();   

    $painter = new Painter; 
    $painter->username = 'Vincent Van Gogh';
    $painter->bio = 'Dutch post-impressionist painter. Famous paintings include: Sunflowers, The Starry night, Cafe Terrace at Night.';
    $painter->save();   

    $painter = new Painter; 
    $painter->username = 'Rembrandt';
    $painter->bio = 'One of greatest painters, admired for his vivid realism. Famous paintings include The Jewish Bride, The Storm of the sea of Galilee';
    $painter->save();   
});

string ‘insert into painters (username, bio, updated_at, created_at) values (?, ?, ?, ?)’ (length=90)

Great! Now, we know that Painters will likely have created some Paintings. For Brevity, I will show just one snippet of how we can insert a Painting. Just note that for our purposes Leonardo Da Vinci is painter_id 2, Vincent Van Gogh is id painter_id 3, and Rembrandt is id painter_id 4. It is by this very field, painter_id, which is in the paintings table, that facilitates our relationships. We’ll need to remember this when constructing methods to select data from our database using relationships!

Sample Painting insert:
PHP
Route::get('/', function()
{
    $painter = Painter::find(4);
   
    $painting = new Painting;
    $painting->title = 'The Storm on the Sea of Galilee';
    $painting->body = 'The Storm on the Sea of Galilee is a painting from 1633 by the Dutch Golden Age painter Rembrandt van Rijn that was in the Isabella Stewart Gardner Museum of Boston, Massachusetts, United States, prior to being stolen on March 18, 1990.';
    $painting->painter_id = $painter->id;
    $painting->save();
});

   
Route::get('/', function()
{
    $painter = Painter::find(4);
   
    $painting = new Painting;
    $painting->title = 'The Storm on the Sea of Galilee';
    $painting->body = 'The Storm on the Sea of Galilee is a painting from 1633 by the Dutch Golden Age painter Rembrandt van Rijn that was in the Isabella Stewart Gardner Museum of Boston, Massachusetts, United States, prior to being stolen on March 18, 1990.';
    $painting->painter_id = $painter->id;
    $painting->save();
});

note: We execute variations on the above code a few times in order to give each Painter at least 2 Paintings each in the database.
hasMany

A Painter will typically have many Paintings just like an Author may have many Books, or a Chicken may have many eggs. In Laravel, we can define relationships like this in our Model like so:

PHP
<?php
class Painter extends Eloquent {
   
    public function paintings()
    {
        return $this->hasMany('Painting');
    }
   
}

   
<?php
class Painter extends Eloquent {
   
    public function paintings()
    {
        return $this->hasMany('Painting');
    }
   
}

Here is a great trick to help you remember how this works! Start with the $this keyword, followed by the class name of the file, followed by the $this method, followed by the Model passed in. So in this case it would read like: This Painter hasMany Painting. See how that works?!
belongsTo

The inverse of this is that all Paintings must have been Painted by a Painter. We could also say that a Painting belongsTo a Painter. Let’s see this model!

PHP
<?php
class Painting extends Eloquent {
   
    public function painter()
    {
        return $this->belongsTo('Painter');
    }
   
}

   
<?php
class Painting extends Eloquent {
   
    public function painter()
    {
        return $this->belongsTo('Painter');
    }
   
}

We can use the same trick here! (this|name of class file|name of method|name of model passed in) So in this case we would have This Painting belongsTo Painter.

Nice work 🙂
Dynamic Methods, Oh My!

Now that we have set up our models to represent both the hasMany and belongsTo relationships, we can start querying the database in very clever ways. For example, by using dynamic methods and the relationships we just created, we can tell the database to go get Leonardo Da Vinci’s paintings and return them to us. Let’s see it:

PHP
Route::get('/', function()
{
    $painter = Painter::whereUsername('Leonardo Da Vinci')->first();
   
    foreach($painter->paintings as $painting){
        echo $painting->title.'<br>';
        echo $painting->body.'<br><br>';
    }

});

   
Route::get('/', function()
{
    $painter = Painter::whereUsername('Leonardo Da Vinci')->first();
   
    foreach($painter->paintings as $painting){
        echo $painting->title.'<br>';
        echo $painting->body.'<br><br>';
    }

});

string ‘select * from painters where username = ? limit 1′ (length=53)
string ‘select * from paintings where paintings.painter_id = ?’ (length=60)

Mona Lisa
The Mona Lisa is a half-length portrait of a woman by the Italian artist Leonardo da Vinci, which has been acclaimed as “the best known, the most visited, the most written about, the most sung about, the most parodied work of art in the world

Last Supper
The Last Supper is a late 15th-century mural painting by Leonardo da Vinci in the refectory of the Convent of Santa Maria delle Grazie, Milan. The work is presumed to have been commenced around 1495 and was commissioned as part of a scheme of renovations to the church and its convent buildings by Leonardos patron Ludovico Sforza, Duke of Milan.

Notice the whereUsername method, I haven’t seen that one before! No you haven’t friend, that’s because with Laravel you can combine a where clause with the table name and pass in the string you are looking for! Mind Blown! There is your dynamic method. Now with regard to the relationship, this one works since in our Painter model, we told it that This Painter hasMany Painting!

Let’s now do the inverse, we’ll ask the database something like “Who Painted The Potato Eaters?” With our relation set in the Painting model such that This Painting belongsTo Painter, we should also be able to do this in reverse:

PHP
Route::get('/', function()
{
    $painting = Painting::whereTitle('The Potato Eaters')->first();
   
    echo Painter::find($painting->painter_id)->username;

});

   
Route::get('/', function()
{
    $painting = Painting::whereTitle('The Potato Eaters')->first();
   
    echo Painter::find($painting->painter_id)->username;

});

string ‘select * from paintings where title = ? limit 1′ (length=51)
string ‘select * from painters where id = ? limit 1′ (length=47)
Vincent Van Gogh

Of Course! Vincent Van Gogh is the Painter that painted ‘The Potato Eaters’! The above code was the long hand way to do this. You see, when we create both relationships, we can combine the models to reach any field on either table by going through it! Since we created an instance of the Painting model in $painting, we can now go through the Painter model to reach any field in that table. How? Like this:

Route::get('/', function()
{
    $painting = Painting::whereTitle('The Potato Eaters')->first();
   
    echo $painting->painter->username.'<br>';
    echo $painting->painter->bio;

});

   
Route::get('/', function()
{
    $painting = Painting::whereTitle('The Potato Eaters')->first();
   
    echo $painting->painter->username.'<br>';
    echo $painting->painter->bio;

});

string ‘select * from paintings where title = ? limit 1′ (length=51)
string ‘select * from painters where painters.id = ? limit 1′ (length=58)
Vincent Van Gogh
Dutch post-impressionist painter. Famous paintings include: Sunflowers, The Starry night, Cafe Terrace at Night.

Notice the only Model that was instantiated is the Painting model, yet we are accessing fields in the painters table with ease since we are going through it!

Use your imagination and you can basically ask the database anything you want, it just takes a little bit of trial and error. Let’s tell the database to “Get me all the paintings you have and tell me who painted each one“! Eye eye Captain!

PHP
Route::get('/', function()
{
    $paintings = Painting::all();
   
    foreach($paintings as $painting){
        echo $painting->painter->username;
        echo ' painted the ';
        echo $painting->title;
    }

});

   
Route::get('/', function()
{
    $paintings = Painting::all();
   
    foreach($paintings as $painting){
        echo $painting->painter->username;
        echo ' painted the ';
        echo $painting->title;
    }

});

string ‘select * from paintings‘ (length=25)
string ‘select * from painters where painters.id = ? limit 1′ (length=58)
Leonardo Da Vinci painted the Mona Lisa
string ‘select * from painters where painters.id = ? limit 1′ (length=58)
Leonardo Da Vinci painted the Last Supper
string ‘select * from painters where painters.id = ? limit 1′ (length=58)
Vincent Van Gogh painted the The Starry Night
string ‘select * from painters where painters.id = ? limit 1′ (length=58)
Vincent Van Gogh painted the The Potato Eaters
string ‘select * from painters where painters.id = ? limit 1′ (length=58)
Rembrandt painted the The Night Watch
string ‘select * from painters where painters.id = ? limit 1′ (length=58)
Rembrandt painted the The Storm on the Sea of Galilee

Notice how many queries that is hitting our database with. This is probably not ideal. A better way to do this would be to use eager loading by way of the with method:

PHP
Route::get('/', function()
{
    $paintings = Painting::with('painter')->get();
   
    foreach($paintings as $painting){
        echo $painting->painter->username;
        echo ' painted the ';
        echo $painting->title;
        echo '<br>';
    }

});

   
Route::get('/', function()
{
    $paintings = Painting::with('painter')->get();
   
    foreach($paintings as $painting){
        echo $painting->painter->username;
        echo ' painted the ';
        echo $painting->title;
        echo '<br>';
    }

});

string ‘select * from paintings‘ (length=25)
string ‘select * from painters where painters.id in (?, ?, ?)’ (length=59)

Leonardo Da Vinci painted the Mona Lisa
Leonardo Da Vinci painted the Last Supper
Vincent Van Gogh painted the The Starry Night
Vincent Van Gogh painted the The Potato Eaters
Rembrandt painted the The Night Watch
Rembrandt painted the The Storm on the Sea of Galilee

Now that’s more like it boss. 2 queries, and we’re done!

Well, that’s enough for this one. There are many more things to learn in Laravel, but I hope this helped in some way!

Read More