Showing posts with label Laravel. Show all posts

Create a a Personal Blog with laravel 5.2

05:27:00


In this tutorial, we’ll code a simple personal blog with Laravel. The Tutorial is Updated to Laravel 5.2 So , We’ll also cover Laravel’s built-in authentication, paginate mechanism, and named routes. We’ll elaborate some rapid development methods, which come with Laravel, such as creating route URLs. The following topics will be covered in this chapter:

    Creating and migrating the posts database
    Creating a posts model
    Creating and migrating the authors database
    Creating a members-only area
    Saving a blog post
    Assigning blog posts to users
    Listing articles
    Paginating the content

Creating and migrating the posts database

We assume that you have already defined database credentials in the app/config/database.phpfile. For this application, we need a database. You can simply create and run the following SQL command or basically you can use your database administration interface, something like phpMyAdmin:

CREATE DATABASE laravel_blog

After successfully creating the database for the application, first we need to create a posts table and install it in the database. To do this, open up your terminal, navigate through your project folder, and run this command:

php artisan make:migration create_posts_table --table=posts --create

This command will generate a migration file under app/database/migrations for generating a new MySQL table named posts in our laravel_blog database.

To define our table columns and specifications, we need to edit this file. After editing the migration file, it should look like this:

<?php

use Illuminate\Database\Schema\Blueprint;
use Illuminate\Database\Migrations\Migration;

class CreatePostsTable extends Migration {

  /**
   * Run the migrations.
   *
   * @return void
   */
  public function up()
  {
    Schema::create('posts', function(Blueprint $table)
    {
      $table->increments('id');
      $table->string('title');
      $table->text('content');
      $table->integer('author_id');
      $table->timestamps();
    });
  }

  /**
   * Reverse the migrations.
   *
   * @return void
   */
  public function down()
  {
    Schema::drop('posts');
  }
}

After saving the file, we need to use a simple artisan command to execute migrations:

php artisian migrate

If no error occurs, check the laravel_blog database for the posts table and columns.

Creating a posts model

As you know, for anything related to database operations on Laravel, using models is the best practice. We will benefit from the Eloquent ORM.

Save this code in a file named as Posts.php under app

<?php
class Post extends Eloquent {

protected $table = 'posts';

protected $fillable = array('title','content','author_id');

public $timestamps = true;

public function Author(){

      return $this->belongsTo('User','author_id');
}

}

We have set the database table name with the protected $table variable. We have also set editable columns with the $fillable variable and timestamps with the $timestamps variable as we’ve already seen and used in previous chapters. The variables which are defined in the model are enough for using Laravel’s Eloquent ORM. We’ll cover the public Author() function in the Assigning blog posts to users section of this chapter.

Our posts model is ready. Now we need an authors model and database to assign blog posts to authors. Let’s investigate Laravel’s built-in authentication mechanism.

Creating and migrating the authors database

Contrary to most of the PHP frameworks, Laravel has a basic authentication class. The authentication class is very helpful in rapidly developing applications. First, we need a secret key for our application. The application secret key is very important for our application’s security because all data is hashed salting this key. The artisan command can generate this key for us with a single command line:

php artisian key:generate

If no error occurs, you will see a message that tells you that the key is generated successfully. After key generation, if you face problems with opening your Laravel application, simply clear your browsercache and try again. Next, we should edit the authentication class’s configuration file. For using Laravel’s built-in authentication class, we need to edit the configuration file, which is located atapp/config/auth.php. The file contains several options for the authentication facilities. If you need to change the table name, and so on, you can make the changes under this file. By default, Laravel comes with the User model. You can see the User.php file, which is located at app/models/. With Laravel 4, we need to define which fields are fillable in our Users model. Let’s edit User.php located at app/models/ and add the “fillable” array:

<?php

use Illuminate\Auth\UserInterface;
use Illuminate\Auth\Reminders\RemindableInterface;

class User extends Eloquent implements UserInterface, RemindableInterface {

  /**
   * The database table used by the model.
   *
   * @var string
   */
  protected $table = 'users';

  /**
   * The attributes excluded from the model's JSON form.
   *
   * @var array
   */
  protected $hidden = array('password');

  //Add to the "fillable" array
   protected $fillable = array('email', 'password', 'name');

  /**
   * Get the unique identifier for the user.
   *
   * @return mixed
   */
  public function getAuthIdentifier()
  {
    return $this->getKey();
  }

  /**
   * Get the password for the user.
   *
   * @return string
   */
  public function getAuthPassword()
  {
    return $this->password;
  }

  /**
   * Get the e-mail address where password reminders are sent.
   *
   * @return string
   */
  public function getReminderEmail()
  {
    return $this->email;
  }

}

Basically, we need three columns for our authors. These are:

    email: This column stores author’s e-mails
    password: This column stores authors’ passwords
    name: This column stores the authors’ names and surnames

Now we need several migration files to create the users table and add an author to our database. To create a migration file, give a command such as the following:

php artisan make:migration create_users_table --table=users --create

Open the migration file, which was created recently and located at database/migrations/. We need to edit the up() function as the following:

  public function up()
  {
    Schema::create('users', function(Blueprint $table)
    {
      $table->increments('id');
      $table->string('email');
      $table->string('password');
      $table->string('name');
      $table->timestamps();
    });
  }

After editing the migration file, run the migrate command:

php artisian migrate

As you know, the command creates the users table and its columns. If no error occurs, check thelaravel_blog database for the users table and the columns.

Now we need to create a new migration file for adding some authors to the database. We can do so by running the following command:

php artisan make:migration add_some_users

Open up the migration file and edit the up() function as the following:

  public function up()
  {
    User::create(array(
            'email' => 'your@email.com',
            'password' => Hash::make('password'),
            'name' => 'John Doe'
        ));
  }

We used a new class in the up() function, which is named Hash. Laravel has a hash maker/checker class, which is based on secure Bcrypt. Bcrypt is an accepted, secure hashing method for important data such as passwords.

The class for which we have created an application key with the artisan tool at the beginning of this chapter is used for salting. So, to apply migration, we need to migrate with the following artisan command:

php artisian migrate

Now, check the users table for a record. If you check the password column, you will see a record stored as follows:

$2y$08$ayylAhkVNCnkfj2rITbQr.L5pd2AIfpeccdnW6.BGbA.1VtJ6Sdqy

It is very important to securely store your user’s passwords and their critical data. Do not forget that if you change the application key, all the existing hashed records will be unusable because the Hashclass uses the application key as the salting key when validating and storing given data.

Creating a members-only area

As you know, our blog system is member based. Because of that we need some areas to be accessible by members only, for adding new posts to the blog. We have two different methods to do this. The first one is the route filter method, which we will elaborate in the next chapters. The second is the template-based authorization check. This method is a more effective way of understanding the use of the Auth class with the Blade template system.

With the Auth class we can check the authorization status of a visitor by just a single line of code:

Auth::check();

The check() function, which is based on the Auth class, always returns true or false. So, that means we can easily use the function in an if/else statement in our code. As you know from previous chapters, with the blade template system we were able to use that kind of PHP statement in the template files.

Before creating the template files we need to write our routes. We need four routes for our application. These are:

    A login route to process login requests
    A new post route to process new post requests
    An admin route to show a new post form and a login form
    An index route to list posts

Named routing is another amazing feature of the Laravel framework for rapid development. Named routes allow referring to routes when generating redirects or URLs more comfortably. You may specify a name for a route as follows:

Route::get('all/posts', array('as' => 'posts', function()
{
    //
}));

You may also specify route names for controllers:

Route::get('all/posts', array('as' => 'allposts', , 'uses' => 'PostController@showPosts'));

Thanks to the named routes, we can easily create URLs for our application:

$url = URL::route('allposts');

We can also use the named routes to redirect:

$redirect = Redirect::route('allposts');

Open the route configuration file, which is located at app/http/routes.php and add the following code:

Route::get('/', array('as' => 'index', 'uses' => 'PostsController@getIndex'));
Route::get('/admin', array('as' => 'admin_area', 'uses' => 'PostsController@getAdmin'));
Route::post('/add', array('as' => 'add_new_post', 'uses' => 'PostsController@postAdd'));
Route::post('/login', array('as' => 'login', 'uses' => 'UsersController@postLogin'));
Route::get('/logout', array('as' => 'logout', 'uses' => 'UsersController@getLogout'));

Now we need to write the code for the controller side and templates of our application. First, we can start coding from our admin area. Let’s create a file under resources/views/ with the name addpost.blade.php. Our admin template should look like the following:

<html>
<head>
<title>Welcome to Your Blog</title>
<link rel="stylesheet" type="text/css" href="/assets/css/style.css">
<!--[if lt IE 9]><script src="//html5shim.googlecode.com/svn/trunk/html5.js"></script><![endif]-->
</head>
<body>
@if(Auth::check())
<section class="container">
<div class="content">
<h1>Welcome to Admin Area, {{Auth::user()->name}} ! - <b>{{link_to_route('logout','Logout')}}</b></h1>
<form name="add_post" method="POST" action="{{URL::route('add_new_post')}}">
<p><input type="text" name="title" placeholder="Post Title" value=""/></p>
<p><textarea name="content" placeholder="Post Content"></textarea></p>
<p><input type="submit" name="submit" /></p>
</div>
</section>
@else
<section class="container">
<div class="login">
<h1>Please Login</h1>
<form name="login" method="POST" action="{{URL::route('login')}}">
<p><input type="text" name="email" value="" placeholder="Email"></p>
<p><input type="password" name="password" value="" placeholder="Password"></p>
<p class="submit"><input type="submit" name="commit" value="Login"></p>
</form>
</div>
</section>
@endif
</body>
</html>

As you can see in the code, we use if/else statements in a template to check a user’s login credentials. We know already from the beginning of this section that we use the Auth::check()function to check the login status of a user. Also, we’ve used a new method to get the currently logged in user’s name:

Auth::user()->name;

We can get any information about the current user with the user method:

Auth::user()->id;
Auth::user()->email;

The template code first checks the login status of the visitor. If the visitor has logged in, the template shows a new post form; else it shows a login form.

Now we have to code the controller side of our blog application. Let’s start from our users controller. Create a file under app/controller/, which is named UsersContoller.php. The final code of the controller should be as follows:

<?php

class UsersController extends BaseController{

  public function postLogin()
  {
    Auth::attempt(array('email' => Input::get('email'),'password' => Input::get('password')));
  return Redirect::route('add_new_post');

  }
 
  public function getLogout()
  {
    Auth::logout();
    return Redirect::route('index');
  }
}

The controller has two functions: the first is the postLogin() function. This function basically checks the posted form data for user login and then redirects the visitor to the add_new_post route to show the new post form. The second function processes the logout request and redirects to the index route.

Saving a blog post

Now we need one more controller for our blog posts. So, create a file under app/http/controller/, that is named PostsContoller.php. The final code of the controller should be as follows:

<?php
class PostsController extends BaseController{

  public function getIndex()
  {
 
  $posts = Post::with('Author')-> orderBy('id', 'DESC')->get();
  return View::make('index')->with('posts',$posts);
 
  }
  public function getAdmin()
  {
  return View::make('addpost');
  }
  public function postAdd()
  {
  Post::create(array(
              'title' => Input::get('title'),
              'content' => Input::get('content'),
              'author_id' => Auth::user()->id
   ));
  return Redirect::route('index');
  }
}

Assigning blog posts to users

The postAdd() function processes the new blog post create request on the database. As you can see, we can get the author’s ID with a previously mentioned method:

Auth::user()->id

With this method, we can assign the current user with a blog post. As you will see, we have a new method in the query:

Post::with('Author')->

If you remember, we’ve defined a public Author () function in our Posts model:

public function Author(){

      return $this->belongsTo('User','author_id');
}

The belongsTo() method is an Eloquent function to create relations between tables. Basically the function needs one required variable and one optional variable. The first variable (required) defines the target Model. The second and optional variable is to define the source column of the current model’s table. If you don’t define the optional variable, the Eloquent class searches thetargetModelName_id column. In the posts table, we store the authors’ IDs in the author_idcolumn, not in the column named user_id. Because of this, we need to define a second optional variable in the function. With this method, we can pass our blog posts and all its authors’ information to the template file. You can think of the method as some kind of a SQL join method.


When we want to use these relation functions in queries, we can easily call them as follows:

Books::with('Categories')->with('Author')->get();

It is easy to manage the template files with fewer variables. Now we have just one variable to pass the template file, which is combined with all the necessary data. So, we need the second template file to list our blog posts. This template will work at our blog’s frontend.

Listing articles

In the previous sections of this chapter, we’ve learned to use PHP if/else statements within blade template files. Laravel passes data to the template file as an array. So we need to use the foreachloop to parse data into the template file. We can also use a foreach loop in template files. So create a file under resources/views/ named index.blade.php. The code should look as follows:
<!doctype html>
<html lang="en">
<head>
<meta charset="utf-8" />
<title>My Awesome Blog</title>
<link rel="stylesheet" href="/assets/blog/css/styles.css" type="text/css" media="screen" />
<link rel="stylesheet" type="text/css" href="/assets/blog/css/print.css" media="print" />
<!--[if IE]><script src="http://html5shiv.googlecode.com/svn/trunk/html5.js"></script><![endif]-->
</head>
<body>
<div id="wrapper">
<header>
<h1><a href="/">My Awesome Blog</a></h1>
<p>Welcome to my awesome blog</p>
</header>
<section id="main">
<section id="content">
@foreach($posts as $post)
<article>
<h2>{{$post->title}}</h2>
<p>{{$post->content}}</p>
<p><small>Posted by <b>{{$post->Author->name}}</b> at <b>{{$post->created_at}}</b></small></p>
</article>

@endforeach          
</section>
</aside>
</section>
<footer>
<section id="footer-area">
<section id="footer-outer-block">
<aside class="footer-segment">
<h4>My Awesome Blog</h4>
</aside>
</section>
</section>
</footer>
</div>
</body>
</html>
Let’s dig the code. We’ve used a foreach loop inside the template file to parse all blog post data. Also, we see the combined author data usage in the foreach loop. As you may remember, we get the author information with the belongsTo() method in the model side. The whole relational data parsing is done inside an array, which is named the relation function name. For example, if we had a second relation function, which is named Categories(), the query would be something as follows on the controller side:
$books = Books::with('Author')-> with('Categories')->orderBy('id', 'DESC')->get();
The foreach loop would look as follows:
@foreach($books as $book)

<article>
<h2>{{$book->title}}</h2>
<p>Author: <b>{{$book->Author->name}}</b></p>
<p>Category: <b>{{$book->Category->name}}</b></p>
</article>

@endforeach
 
Paginating the content

Eloquent’s get() method, which we’ve used in the controller side in the Eloquent query, fetches all the data from the database with a given condition. Often we need to paginate the content for a user-friendly frontend or less page loads and optimizations. The Eloquent class has a helpful method to do this quickly, which is called paginate(). This method fetches the data paginated and generates paginate links in the template with just a single line of code. Open theapp/controllers/PostsController.php file and change the query as follows:

$posts = Post::with('Author')->orderBy('id', 'DESC')->paginate(5);

The paginate() method paginates the data with the given numeric value. So, the blog posts will be paginating each page into 5 blog posts. We have to also change our template to show pagination links. Open app/views/index.blade.php and add the following code after the foreach loop:

{{$posts->links()}}

The section in the template, which has the İD as "main", should look as follows:

<section id="main">
<section id="content">
@foreach($posts as $post)

<article>
<h2>{{$post->title}}</h2>
<p>{{$post->content}}</p>
<p><small>Posted by <b>{{$post->Author->name}}</b> at <b>{{$post->created_at}}</b></small></p>
</article>
@endforeach

</section>
{{$posts->links()}}
</section>

The links() function will generate pagination links automatically, if there is enough data to paginate. Else, the function shows nothing.
Wrapping up

In this tutorial, we’ve created a simple blog with Laravel’s built-in functions and the Eloquent database driver. We’ve learned how to paginate the data and Eloquent’s basic data relation mechanism. Also we’ve covered Laravel’s built-in authentication mechanism. In the next chapters, we’ll learn how to work with more complex tables and relational data. 
Read More

Create a CRUD Application with Laravel 5.2 part-1

04:36:00


let’s create a simple CRUD application with Laravel . we have updated This tutorial to laravel 5.2 . The application we want to create will manage the users of our application. We will create the following list of features for our application:
  • List users (read users from the database)
  • Create new users
  • Edit user information
  • Delete user information
  • Adding pagination to the list of users
Now to start off with things, we would need to set up a database. So if you have phpMyAdmin installed with your local web server setup, head over to http://localhost/phpmyadmin; if you don’t have phpMyAdmin installed, use the MySQL admin tool workbench to connect with your database and create a new database.
Requirements -> html form –> please install this and follow instructions from official site

Preview

users

Now we need to configure Laravel to connect with our database. So head over to your Laravel application folder, open config/database.php, change the MySQL array, and match your current database settings. Here is the MySQL database array from database.php file:
    'mysql' => array(
      'driver'    => 'mysql',
      'host'      => 'localhost',
      'database'  => '<yourdbname>',
      'username'  => 'root',
      'password'  => '<yourmysqlpassord>',
      'charset'   => 'utf8',
      'collation' => 'utf8_unicode_ci',
      'prefix'    => '',
    ),
Now we are ready to work with the database in our application. Let’s first create the database table Users via the following SQL queries from phpMyAdmin or any MySQL database admin tool;
CREATE TABLE IF NOT EXISTS 'users' (
  'id' int(10) unsigned NOT NULL AUTO_INCREMENT,
  'username' varchar(255) COLLATE utf8_unicode_ci NOT NULL,
  'password' varchar(255) COLLATE utf8_unicode_ci NOT NULL,
  'email' varchar(255) COLLATE utf8_unicode_ci NOT NULL,
  'phone' varchar(255) COLLATE utf8_unicode_ci NOT NULL,
  'name' varchar(255) COLLATE utf8_unicode_ci NOT NULL,
  'created_at' timestamp NOT NULL DEFAULT '0000-00-00 00:00:00',
  'updated_at' timestamp NOT NULL DEFAULT '0000-00-00 00:00:00',
  PRIMARY KEY ('id')
) ENGINE=InnoDB  DEFAULT CHARSET=utf8 COLLATE=utf8_unicode_ci AUTO_INCREMENT=3 ;
Now let’s seed some data into the Users table so when we fetch the users we won’t get empty results. Run the following queries into your database admin tool:
INSERT INTO 'users' ('id', 'username', 'password', 'email', 'phone', 'name', 'created_at', 'updated_at') VALUES
(1, 'john', 'johndoe', 'johndoe@gmail.com', '123456', 'John', '2013-06-07 08:13:28', '2013-06-07 08:13:28'),
(2, 'amy', 'amy.deg', 'amy@outlook.com', '1234567', 'amy', '2013-06-07 08:14:49', '2013-06-07 08:14:49');

Note

Later we will see how we can manage our database via laravel 5.2’s powerful migrations features. At the end of this chapter, I will introduce you to why it’s not a good practice to manually create SQL queries and make changes to the database structure. And I know that passwords should not be plain too!

Listing the users – read users from database

Let’s read users from the database. We would need to follow the steps described to read users from database:
  • A route that will lead to our page
  • A controller that will handle our method
  • The Eloquent Model that will connect to the database
  • A view that will display our records in the template
So let’s create our route at /app/http/routes.php. Add the following line to the routes.php file:
Route::resource('users', 'UserController');
If you have noticed previously, we had Route::get for displaying our page Controller. But now we are using resource. So what’s the difference?
In general we face two types of requests during web projects: GET and POST. We generally use these HTTP request types to manipulate our pages, that is, you will check whether the page has any POST variables set; if not, you will display the user form to enter data. As a user submits the form, it will send a POST request as we generally define the <form method="post"> tag in our pages. Now based on page’s request type, we set the code to perform actions such as inserting user data into our database or filtering records.
What Laravel provides us is that we can simply tap into either a GET or POST request via routes and send it to the appropriate method. Here is an example for that:
Route::get('/register', 'UserController@showUserRegistration');
Route::post('/register', 'UserController@saveUser');
See the difference here is we are registering the same URL, /register, but we are defining its GET method so Laravel can call UserController class’ showUserRegistration method. If it’s the POST method, Laravel should call the saveUser method of the UserController class.
You might be wondering what’s the benefit of it? Well six months later if you want to know how something’s happening in your app, you can just check out the routes.php file and guess which Controller and which method of Controller handles the part you are interested in, developing it further or solving some bug. Even some other developer who is not used to your project will be able to understand how things work and can easily help move your project. This is because he would be able to somewhat understand the structure of your application by checking routes.php.
Now imagine the routes you will need for editing, deleting, or displaying a user. Resource Controller will save you from this trouble. A single line of route will map multiple restful actions with our resource Controller. It will automatically map the following actions with HTTP verbs:
HTTP VERBACTION
GETREAD
POSTCREATE
PUTUPDATE
DELETEDELETE

Read More

Create a CRUD Application with Laravel 5.2 part-2

04:34:00


On top of that you can actually generate your Controller via a simple command-line artisan using the following command:

$ php artisan make:controller usercontroller

This will generate UsersController.php with all the RESTful empty methods, so you will have an empty structure to play with. Here is what we will have after the preceding command:

class UserController extends BaseController {

  /**
   * Display a listing of the resource.
   *
   * @return Response
   */
  public function index()
  {
    //
  }

  /**
   * Show the form for creating a new resource.
   *
   * @return Response
   */
  public function create()
  {
    //
  }

  /**
   * Store a newly created resource in storage.
   *
   * @return Response
   */
  public function store()
  {
    //
  }

  /**
   * Display the specified resource.
   *
   * @param  int  $id
   * @return Response
   */
  public function show($id)
  {
    //
  }

  /**
   * Show the form for editing the specified resource.
   *
   * @param  int  $id
   * @return Response
   */
  public function edit($id)
  {
    //
  }

  /**
   * Update the specified resource in storage.
   *
   * @param  int  $id
   * @return Response
   */
  public function update($id)
  {
    //
  }

  /**
   * Remove the specified resource from storage.
   *
   * @param  int  $id
   * @return Response
   */
  public function destroy($id)
  {
    //
  }
 
}


Now let’s try to understand what our single line route declaration created relationship with our generated Controller.
HTTP VERB    Path    Controller Action/method
GET    /Users    Index
GET    /Users/create    Create
POST    /Users    Store
GET    /Users/{id}    Show (individual record)
GET    /Users/{id}/edit    Edit
PUT    /Users/{id}    Update
DELETE    /Users/{id}    Destroy

Read More

Create a CRUD Application with Laravel 5.2 part-3

04:33:00


As you can see, resource Controller really makes your work easy. You don’t have to create lots of routes. Also Laravel ‘s artisan-command-line generator can generate resourceful Controllers, so you will write very less boilerplate code. And you can also use the following command to view the list of all the routes in your project from the root of your project, launching command line:

$ php artisan routes

Now let’s get back to our basic task, that is, reading users. Well now we know that we have UserController.php at /app/controller with the index method, which will be executed when somebody launches http://localhost/laravel/public/users. So let’s edit the Controller file to fetch data from the database.

Well as you might remember, we will need a Model to do that. But how do we define one and what’s the use of Models? You might be wondering, can’t we just run the queries? Well Laravel does support queries through the DB class, but Laravel also has Eloquent that gives us our table as a database object, and what’s great about object is that we can play around with its methods. So let’s create a Model.

If you check your path /app/User.php, you will already have a user Model defined. It’s there because Laravel provides us with some basic user authentication. Generally you can create your Model using the following code:

class User extends Eloquent {}

Now in your controller you can fetch the user object using the following code:

$users = User::all();
$users->toarray();

Yeah! It’s that simple. No database connection! No queries! Isn’t it magic? It’s the simplicity of Eloquent objects that many people like in Laravel.
READ  Understanding Design Patterns in Laravel

But you have the following questions, right?

    How does Model know which table to fetch?
    How does Controller know what is a user?
    How does the fetching of user records work? We don’t have all the methods in the User class, so how did it work?

Well models in Laravel use a lowercase, plural name of the class as the table name unless another name is explicitly specified. So in our case, User was converted to a lowercase user and used as a table to bind with the User class.

Models are automatically loaded by Laravel, so you don’t have to include the reference of the Model file. Each Model inherits an Eloquent instance that resolves methods defined in the model.php file at vendor/Laravel/framework/src/Illumininate/Database/Eloquent/ like all, insert, update, delete and our user class inherit those methods and as a result of this, we can fetch records via User::all().

So now let’s try to fetch users from our database via the Eloquent object. I am updating the index method in our app/controllers/UsersController.php as it’s the method responsible as per the REST convention we are using via resource Controller.

public function index()
 {
 $users = User::all();

 return View::make('users.index', compact('users'));
 }

Read More

Create a CRUD Application with Laravel 5.2 part-4

04:32:00


Now let’s look at the View part. Before that, we need to know about Blade. Blade is a templating engine provided by Laravel. Blade has a very simple syntax, and you can determine most of the Blade expressions within your view files as they begin with @. To print anything with Blade, you can use the {{ $var }} syntax. Its PHP-equivalent syntax would be:

<?php echo $var; ?>

Now back to our view; first of all, we need to create a view file at /resources/views/users/index.blade.php, as our statement would return the view file from users.index. We are passing a compact users array to this view. So here is our index.blade.php file:

@section('main')

<h1>All Users</h1>

<p>{{ link_to_route('users.create', 'Add new user') }}</p>

@if ($users->count())
    <table class="table table-striped table-bordered">
        <thead>
            <tr>
                <th>Username</th>
        <th>Password</th>
        <th>Email</th>
        <th>Phone</th>
        <th>Name</th>
            </tr>
        </thead>

        <tbody>
            @foreach ($users as $user)
                <tr>
                    <td>{{ $user->username }}</td>
          <td>{{ $user->password }}</td>
          <td>{{ $user->email }}</td>
          <td>{{ $user->phone }}</td>
          <td>{{ $user->name }}</td>
                    <td>{{ link_to_route('users.edit', 'Edit', array($user->id), array('class' => 'btn btn-info')) }}</td>
                    <td>
          {{ Form::open(array('method'
=> 'DELETE', 'route' => array('users.destroy', $user->id))) }}                      
                            {{ Form::submit('Delete', array('class' => 'btn btn-danger')) }}
                        {{ Form::close() }}
                    </td>
                </tr>
            @endforeach
             
        </tbody>
     
    </table>
@else
    There are no users
@endif

@stop

Let’s see the code line by line. In the first line we are extending the user layouts via the Blade template syntax @extends. What actually happens here is that Laravel will load the layout file at /app/views/layouts/user.blade.php first.

Here is our user.blade.php file’s code:

<!doctype html>
<html>
    <head>
        <meta charset="utf-8">
        <link href="//netdna.bootstrapcdn.com/twitter-bootstrap/2.3.1/css/bootstrap-combined.min.css" rel="stylesheet">
        <style>
            table form { margin-bottom: 0; }
            form ul { margin-left: 0; list-style: none; }
            .error { color: red; font-style: italic; }
            body { padding-top: 20px; }
        </style>
    </head>

    <body>

        <div class="container">
            @if (Session::has('message'))
                <div class="flash alert">
                    <p>{{ Session::get('message') }}</p>
                </div>
            @endif

            @yield('main')
        </div>

    </body>

</html>

Now in this file we are loading the Twitter bootstrap framework for styling our page, and via yield('main') we can load the main section from the view that is loaded. So here when we load http://localhost/laravel/public/users, Laravel will first load the users.blade.php layout view and then the main section will be loaded from index.blade.php.

Now when we get back to our index.blade.php, we have the main section defined as @section('main'), which will be used by Laravel to load it into our layout file. This section will be merged into the layout file where we have put the @yield ('main') section.
READ  Create a a Personal Blog with laravel 5.2

We are using Laravel’s link_to_route method to link to our route, that is, /users/create. This helper will generate an HTML link with the correct URL. In the next step, we are looping through all the user records and displaying it simply in a tabular format. Now if you have followed everything, you will be greeted by the following screen:

Read More

Create a CRUD Application with Laravel 5.2 part-5

04:29:00


Creating new users

Now as we have listed our users, let’s write the code for creating new users. To create a new user, we will need to create the Controller method and bind the view for displaying the new user form. We would need to create the Controller method for saving the user too. Now as we have bound the resourceful Controller, we don’t need to create separate routes for each of our request. Laravel will handle that part if we use REST methods.

So first let’s edit the controller at /app/http/controllers/UsersController.php to add a method for displaying the view:

    public function create()
    {
        return View::make('users.create');
    }

This will call a view at /app/resources/users/create.blade.php. So let’s define our create.blade.php view as follows:

@extends('layouts.users')

@section('main')

<h1>Create User</h1>

{{ Form::open(array('route' => 'users.store')) }}
    <ul>

        <li>
            {{ Form::label('name', 'Name:') }}
            {{ Form::text('name') }}
        </li>

        <li>
            {{ Form::label('username', 'Username:') }}
            {{ Form::text('username') }}
        </li>

        <li>
            {{ Form::label('password', 'Password:') }}
            {{ Form::password('password') }}
        </li>

        <li>
            {{ Form::label('password', 'Confirm Password:') }}
            {{ Form::password('password_confirmation') }}
        </li>       

        <li>
            {{ Form::label('email', 'Email:') }}
            {{ Form::text('email') }}
        </li>

        <li>
            {{ Form::label('phone', 'Phone:') }}
            {{ Form::text('phone') }}
        </li>


        <li>
            {{ Form::submit('Submit', array('class' => 'btn')) }}
        </li>
    </ul>
{{ Form::close() }}

@if ($errors->any())
    <ul>
        {{ implode('', $errors->all('<li class="error">:message</li>')) }}
    </ul>
@endif

@stop

Let’s try to understand our preceding view. Here we are extending the users layout we created in our List Users section. Now in the main section, we are using Laravel’s Form helper to generate our form. This helper generates HTML code via its methods such as label, text, and submit.

Refer to the following code:

{{ Form::open(array('route' => 'users.store')) }}

The preceding code will generate the following HTML code:

<form method="POST" action="http://localhost/users" accept-charset="UTF-8">

Read More

Create a CRUD Application with Laravel 5.2 part-6

04:28:00


As you can see it’s really convenient for us to not worry about linking things correctly. Now let’s create our store method to store our form data into our users table:

public function store()
    {
        $input = Input::all();
        $validation = Validator::make($input, User::$rules);

        if ($validation->passes())
        {
            User::create($input);

            return Redirect::route('users.index');
        }

        return Redirect::route('users.create')
            ->withInput()
            ->withErrors($validation)
            ->with('message', 'There were validation errors.');
    }

Here we are first validating all the input that came from the user. The Input::all () function fetches all the $_GET and $_POST variables and puts it into a single array. The reason why we are creating the single input array is so we can check that array against validation rules’ array. Laravel provides a very simple Validation class that can be used to check validations. We could use it to check whether validations provided in the rules array are followed by the input array by using the following line of code:

$validation = Validator::make ($input, User::$rules);

Rules can be defined in an array with validation attributes separated by the column “|”. Here we are using User::$rules where User is our Model and it will have following code:

class User extends Eloquent {

  protected $guarded = array('id');
  protected $fillable = array('name', 'email');

  public static $rules = array(
    'name' => 'required|min:5',
    'email' => 'required|email'
  );
}

As you can observe we have defined two rules mainly for name and e-mail input fields. If you are wondering about $guarded and $fillable variables, these variables are used to prevent mass assignment. When you pass an array into your Model’s create and update methods, Laravel tries to match the right columns and sets values in the database. Now for instance, if a malicious user sends a hidden input named id and changes his ID via the update method of your form, it could be a huge security hole; to prevent this, we should define the $guarded and $fillable arrays. The $guarded array will guard the columns defined in the guarded array, that is, it will prevent anyone from changing values in that column. The $fillable array will only allow elements defined in $fillable to be updated.
READ  20 Best Podcasts For Web Developers

Now we can use the $validation instance we created to check for validations.

$result = $validation->passes();
echo $result; // True or false

If you see our code now, we are checking for validation via the passes() method in our Store() method of UserController. Now if validation gets passed, we can use our user Model to store data into our database. All you need to do is call the Create method of the Model class with the $input array. So refer to the following code:

User::create($input);

The preceding code will store our $input array into the database; yes, it’s equivalent to your SQL query.

Insert into user(name,password,email,city) values (x,x,..,x);

Here we have to fill either the $fillable or $guarded array in the model, otherwise, Laravel will throw a mass assignment exception. Laravel’s Eloquent object automatically matches our input array with the database and creates a query based on our input array. Don’t you think this is a simple way to store input into the database? If user data is inserted, we are using Laravel’s redirect method to redirect it to our list of users’ pages. If validation fails, we are sending all of the input with errors from the validation object into our create users form.

Read More

Create a CRUD Application with Laravel 5.2 part-7

04:27:00


Editing user information

Now as we learned how easy it is to add and list users. Let’s jump into editing a user. In our list users view we have the edit link with the following code:

{{ link_to_route('users.edit', 'Edit', array($user->id), array('class' => 'btn btn-info')) }}

Here, the link_to_route function will generate a link /users/<id>/edit, which will call the resourceful Controller user, and Controller will bind it with the edit method.

So here is the code for editing a user. First of all we are handling the edit request by adding the following code to our UsersController:

    public function edit($id)
    {
        $user = User::find($id);
        if (is_null($user))
        {
            return Redirect::route('users.index');
        }
        return View::make('users.edit', compact('user'));
    }

So when the edit request is fired, it will hit the edit method described in the preceding code snippet. We would need to find whether the user exists in the database. So we use our user model to query the ID using the following line of code:

$user = User::find($id);

Eloquent object’s find method will query the database just like a normal SQL.

Select * from users where id = $id

Then we will check whether the object we received is empty or not. If it is empty, we would just redirect the user to our list user’s interface. If it is not empty, we would direct the user to the user’s edit view with our Eloquent object as a compact array.


So let’s create our edit user view at app/resouces/users/edit.blade.php, as follows:

@extends('users.scaffold')

@section('main')

<h1>Edit User</h1>
{{ Form::model($user, array('method' => 'PATCH', 'route' => array('users.update', $user->id))) }}
    <ul>
        <li>
            {{ Form::label('username', 'Username:') }}
            {{ Form::text('username') }}
        </li>
        <li>
            {{ Form::label('password', 'Password:') }}
            {{ Form::text('password') }}
        </li>
        <li>
            {{ Form::label('email', 'Email:') }}
            {{ Form::text('email') }}
        </li>
        <li>
            {{ Form::label('phone', 'Phone:') }}
            {{ Form::text('phone') }}
        </li>
        <li>
            {{ Form::label('name', 'Name:') }}
            {{ Form::text('name') }}
        </li>
        <li>
            {{ Form::submit('Update', array('class' => 'btn btn-info')) }}
            {{ link_to_route('users.show', 'Cancel', $user->id, array('class' => 'btn')) }}
        </li>
    </ul>
{{ Form::close() }}

@if ($errors->any())
    <ul>
        {{ implode('', $errors->all('<li class="error">:message</li>')) }}
    </ul>
@endif

@stop

Here we are extending our users’ layout as always and defining the main section. Now in the main section, we are using the Form helper to generate a proper REST request for our controller.

{{ Form::model($user, array('method' => 'PATCH', 'route' => array('users.update', $user->id))) }}

Now, you may have not dealt with the method PATCH as we only know of two protocols, GET and POST, as most browsers generally support only these two methods. The REST method for editing is PATCH, and what Laravel does is that it creates a hidden token so it knows which method to call. So the preceding code generates the following code:

<form method="POST" action="http://ch3.sr/users/1" accept-charset="UTF-8">
<input name="_method" type="hidden" value="PATCH">

It actually fires a POST method for browsers that are not capable for handling the PATCH method. Now, when a user submits this form, it will send a request to the update method of UsersController via the resourceful Controller we set in routes.php.

Here is the update method of UsersController:

public function update($id)
    {
        $input = Input::all();
        $validation = Validator::make($input, User::$rules);
        if ($validation->passes())
        {
            $user = User::find($id);
            $user->update($input);
            return Redirect::route('users.show', $id);
        }
return Redirect::route('users.edit', $id)
            ->withInput()
            ->withErrors($validation)
            ->with('message', 'There were validation errors.');
    }

Here Laravel will pass the ID of the user we are editing in the update method. We can use this ID to find the user via our user model’s Eloquent object’s find method. Then we will update the Eloquent object with an input array just like we did in the insert operation.
Deleting user information

To delete a user we can use the destroy method. If you go to our user lists view, you can find the following delete link’s generation code:

{{ Form::open(array('method' => 'DELETE', 'route' => array('users.destroy', $user->id))) }}
{{ Form::submit('Delete', array('class' => 'btn btn-danger')) }}
{{ Form::close() }}

The preceding code is handled by Laravel similar to the way in which it handles the PATCH method. Laravel will generate a post request with the hidden method token set as PATCH, which it can recognize when it hits the Laravel request object.

At UsersController this request will hit the destroy() method as follows:

    public function destroy($id)
    {
        User::find($id)->delete();
        return Redirect::route('users.index');
    }

Laravel will directly send id to the destroy method, so all we have to do is use our user model and delete the record with its delete method. If you noticed Eloquent allows us to chain methods. Isn’t it sweet? So there would be no queries but just one line to delete a user.

That’s one of the reasons to use Eloquent objects in your projects. It allows you to quickly interact with the database and you can use objects to match your business logic.
Adding pagination to our list users

One of the painful tasks most developers face often is that of pagination. With Laravel it’s no more the case, as Laravel provides a simple approach to set pagination to your pages.

Let’s try to implement pagination to our list user’s method. To set pagination we can use the paginate method with Laravel’s Eloquent object. Here is how we can do that:

public function index()
{
  $users = User::paginate(5);
  return View::make('users.index', compact('users'));
}

The preceding code is the index method of the UsersController class, which we were using previously for getting all the users with User::all(). We just used the paginate method to find five records from the database. Now in our list users view, we can use the following code to display pagination links:

{{ echo $users->links(); }}

Here the links() method will generate pagination links for you. And best part, Laravel will manage the code for pagination. So all you have to do is use paginate method with your eloquent object and links method to display generated links.


Wrapping up

So we have set up our simple CRUD application and now we know how easy it is with Laravel to set up CRUD operations. We have seen Eloquent Laravel’s database ORM that makes working with a database simple and easy. We have learned how to list users, create new users, edit users, delete users, and how to add pagination to our application.

Read More

Sublime Text (3) for PHP Developers

22:39:00

A lot of folks in the PHP community have been checking out PHPStorm lately, including myself and most of the developers I work with. We love the code intelligence we get from PHPStorm, but still miss the speed, quick boot-up, and convenience of Sublime Text.
Before I blindly assume PHPStorm is the only way to go, I wanted to see: Can I bring the things a PHP-focused IDE provides PHP developers back to Sublime Text and get the best of both worlds?
Let's start with a quick list of ways that PHPStorm really sets itself apart for me. Please note: There are a million other features that PHPStorm uniquely offers, but to be honest, it's the tiny little conveniences that I've seen provide the biggest boost in efficiency.
Also note: This is Sublime Text 3 we're talking about.

My Must-Haves From PHPStorm 

Without most of these wonderful PHP-focused features, it'll be hard to recommend using something other than PHPStorm, even if it's slower and costlier and uses more memory. So. Can we reproduce them in Sublime Text?
  • Auto-use (import) of classes
  • Class FQCN inline completion
  • Easily navigate to a symbol's definition
  • Easy constructor injection
  • Highlight unused imports
  • Git gutters
  • Code sniffing/PSR-2 validation
  • Code Completion: PHP
  • Code Completion: project code

Package Control 

Before we talk about anything else, you at least need to know how to install packages in Sublime Text.
If you haven't yet, Go install Package Control now.
Unless otherwise specified, every package after this should be installed using Package Control.

Sublime PHP Companion 

The most significantly PHP-focused package for Sublime Text is called Sublime PHP Companion.
Like most packages, it contains a series of actions you can perform. They're mapped to certain keys by default, but you can always re-map them. Update: there is no keymapping by default anymore. Learn more about how to set up PHPCompanion keymapping here.
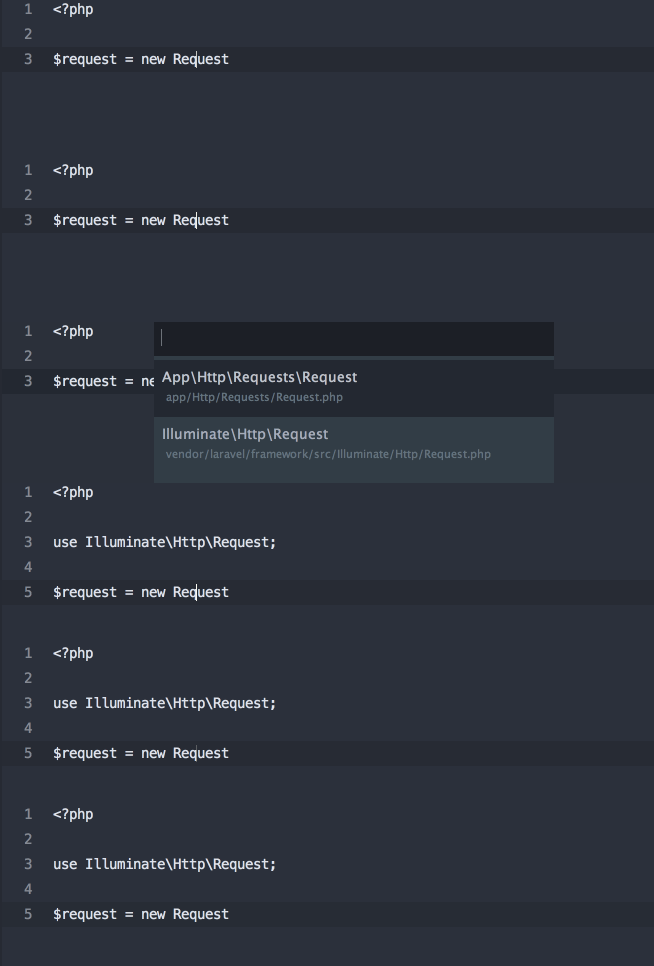
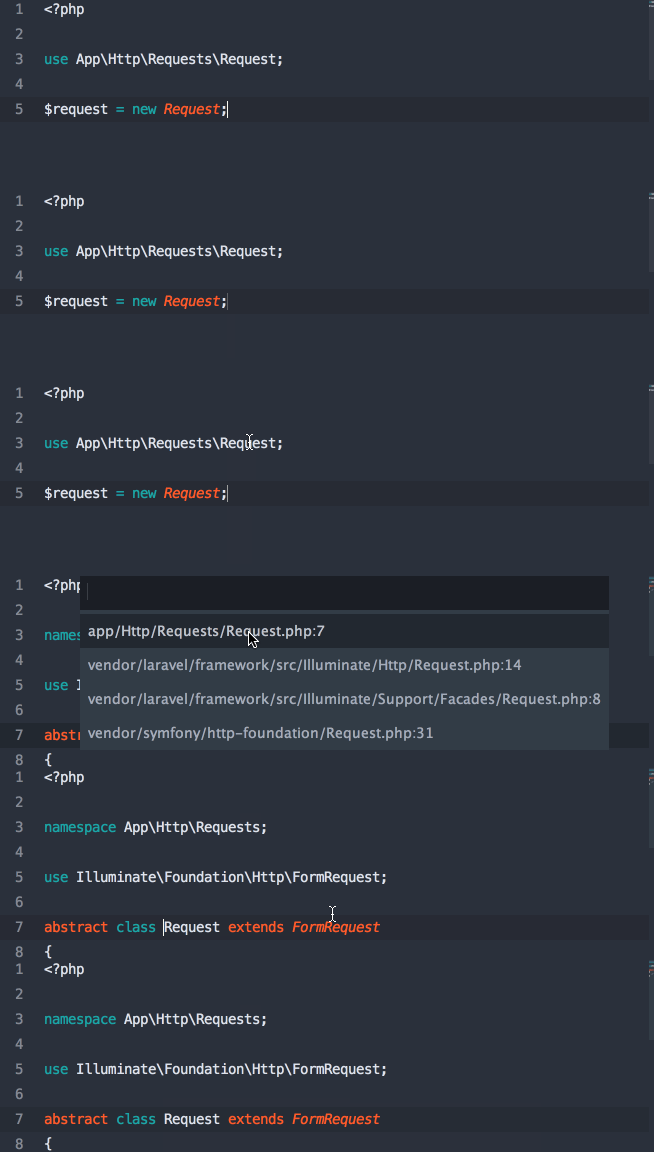
  • find_use (F10) - When your cursor is over a class name, this command makes it simple to use (import) that class. find_use
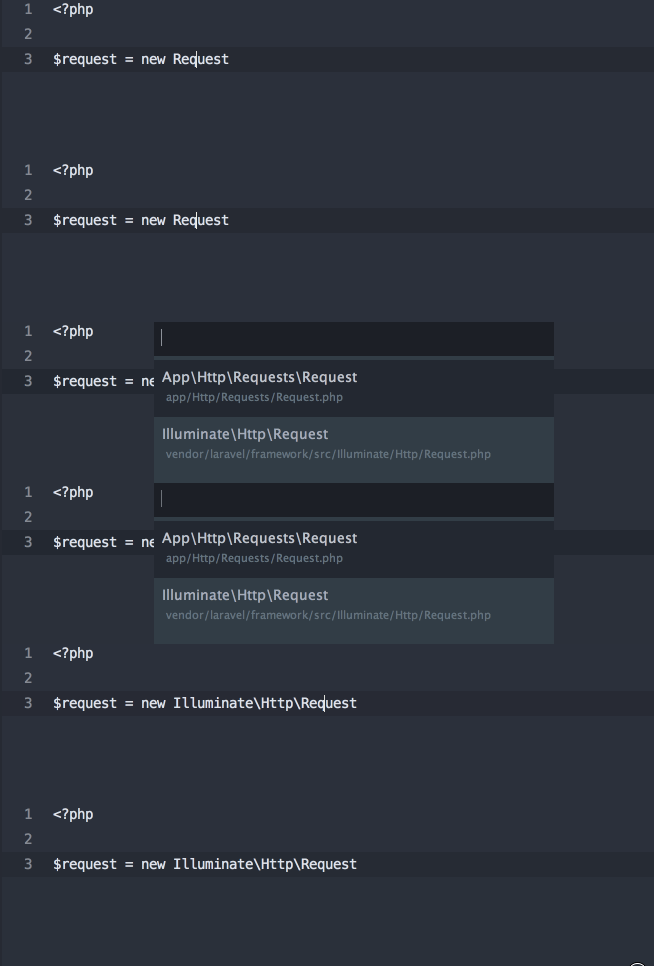
  • expand_fqcn (F9) - Same as find_use but instead of expanding the class in the import block, it expands its FQCN inline. expand_fqcn
  • import_namespace (F8) - Adds the namespace for the current file based on the file's path.
  • goto_definition_scope (shift+F12) - Same as Sublime Text's native goto_definition (described below), but scoped in a PHP-aware manner.
The package isn't perfect, and it is clearly not as bright as PHPStorm is when it comes to detecting namespaces and parsing some weird edge cases. But for day-to-day work, this is a huge boost in the PHP-code-knowledge area.

AllAutocomplete

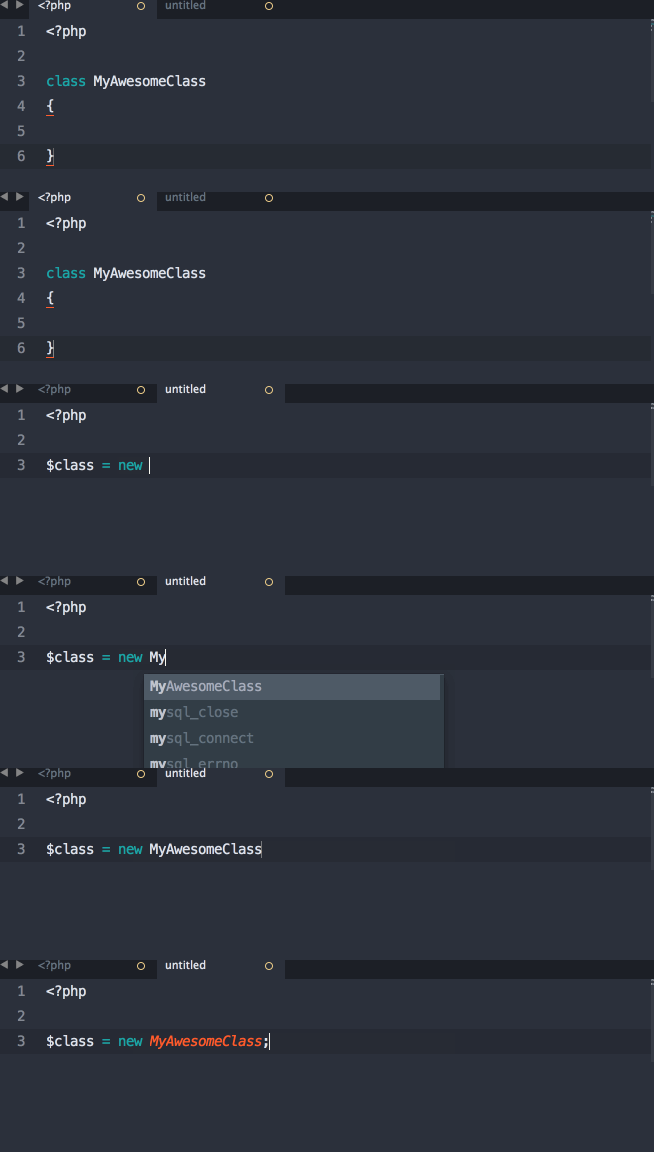
Sublime PHP Companion doesn't sniff your classes and give you autocompletion, sadly, but SublimeAllAutocomplete does register the names of all symbols (functions, classes, etc.) in any files you have open in other tabs and add those to the autocomplete register.
This isn't quite the same as full userland-code-sensitive autocompletion, but it helps a lot.
AllAutocomplete demonstration

Cmd-click for function definition 

Sublime PHP Companion makes it easy to right click on functions and go to their definitions, but this shortcut brings back PHPStorm's CMD-click-to-definition. FYI, in Sublime Text CMD (or windows' ctrl key or whatever it is on other systems) is called "Super".
First, create a user mousemap file. If you don't have one, go here:
Linux
Create Default (Linux).sublime-mousemap in ~/.config/sublime-text-3/Packages/User
Mac
Create Default (OSX).sublime-mousemap in ~/Library/Application Support/Sublime Text 3/Packages/User
Windows
Create Default (Windows).sublime-mousemap in %appdata%\Sublime Text 3\Packages\User
Next, place this in the file:
[
    {
        "button": "button1", 
        "count": 1, 
        "modifiers": ["ctrl"],
        "press_command": "drag_select",
        "command": "goto_definition"
    }
]
You just taught Sublime Text this: "when I hold ctrl and click button one, fire the goto_definition command." Done! (original source)
ST Click to definition
Note: I originally wanted to suggest using the super modifier, so it would be just like PHPStorm; however, that would override Sublime Text's "hold super and click to get multiple cursors" behavior, so I didn't.

Code sniffing and PHP_CodeSniffer 

Sublime PHPCS 

There's a package named Sublime PHPCS that brings PHP_CodeSniffer, PHP's linter, PHP Mess Detector, and Scheck (?) to bear on your code.
You can tweak all sorts of settings, but you're primarily either going to run it every time you save your file (good, but can get annoying), or every time you trigger it from the command palette (press super-shift-p and then type until you get "PHP Code Sniffer: Sniff this file") or keyboard shortcut (ctrl-super-shift-s by default).
You'll get gutter highlights and a list up top of all of the places your code doesn't satisfy the linter.
Note that this and any other packages that rely on code sniffing and linting will be requiring command line applications installed, so be sure to visit their sites and read their directions.

PHP_CodeSniffer Sublime Text 2/3 Plugin 

Interestingly, there's a relatively un-noticed plugin doing the same thing (but for PHPCS only) that's written by the same group that wrote PHP CodeSniffer, so it might be worth checking out as well; it's called PHP_CodeSniffer Sublime Text 2/3 Plugin (creative, I know.)
I've never used this one, though, so proceed with caution.

Mike Francis PHP CS Fixer Build Script

Mike Francis also shared a custom build script he wrote that runs PHP-CS-Fixer on your code whenever you trigger it. That means it'll actually enforce PSR-2 (or whatever other PHP-CS-Fixer standard you pass it) on your code for you.
Taylor Otwell actually shared this same script with me, but he didn't write it up as nicely as Mike did. :) He did, however, mention that you might want to set this preference: "show_panel_on_build": false, This'll keep it from popping out the command panel with your results every time, which can get very irritating very quickly.

SublimeLinter 

SublimeLinter PHP (and its required dependency, SublimeLinter) rely on PHP's built-in linter (just like the Sublime PHPCS plugin above). This is a simpler version that only runs the linter, nothing else.

DocBlockr 

If you're the type to use PHPStorm, there's a greater chance that you're the type to write Doc blocks. (Just sayin').
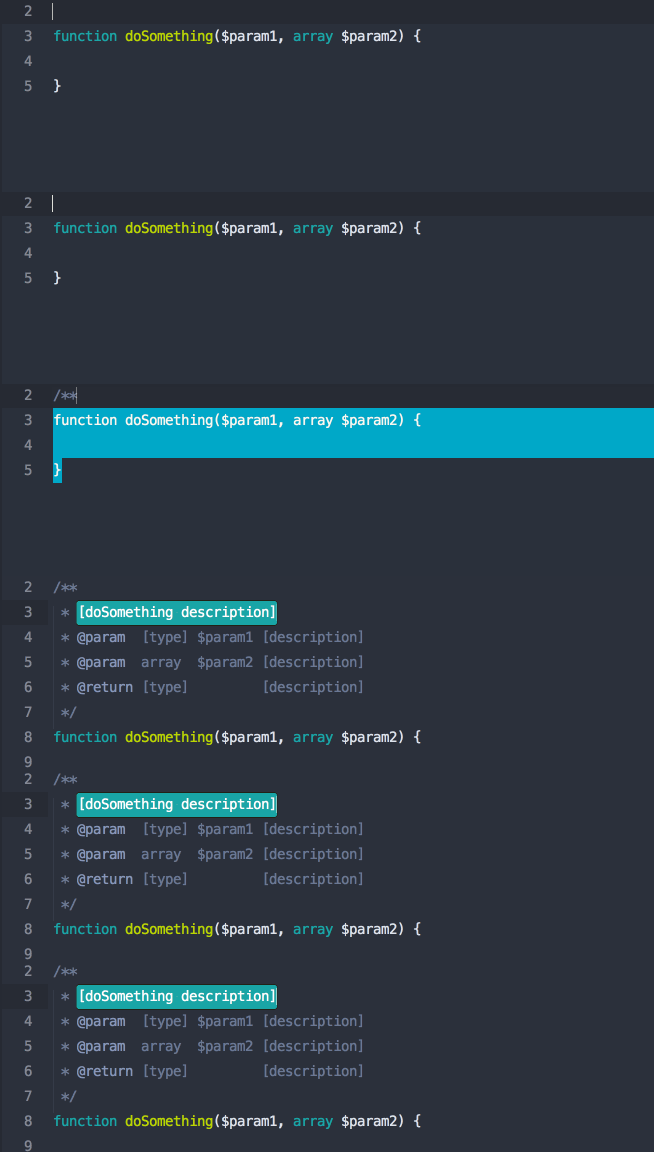
DocBlockr makes it simple to create new doc blocks, but more importantly, if you create a doc block just above a defined function, it will extract that function's parameter information and pre-fill it in your doc block. Boom.
DocBlockr in action

Git helpers 

Sublime Text Git 

Are you the type that hates switching from your IDE to your terminal/Git client? Sublime Text Git provides access to many Git commands directly from the Sublime Text command palette.

GitGutter 

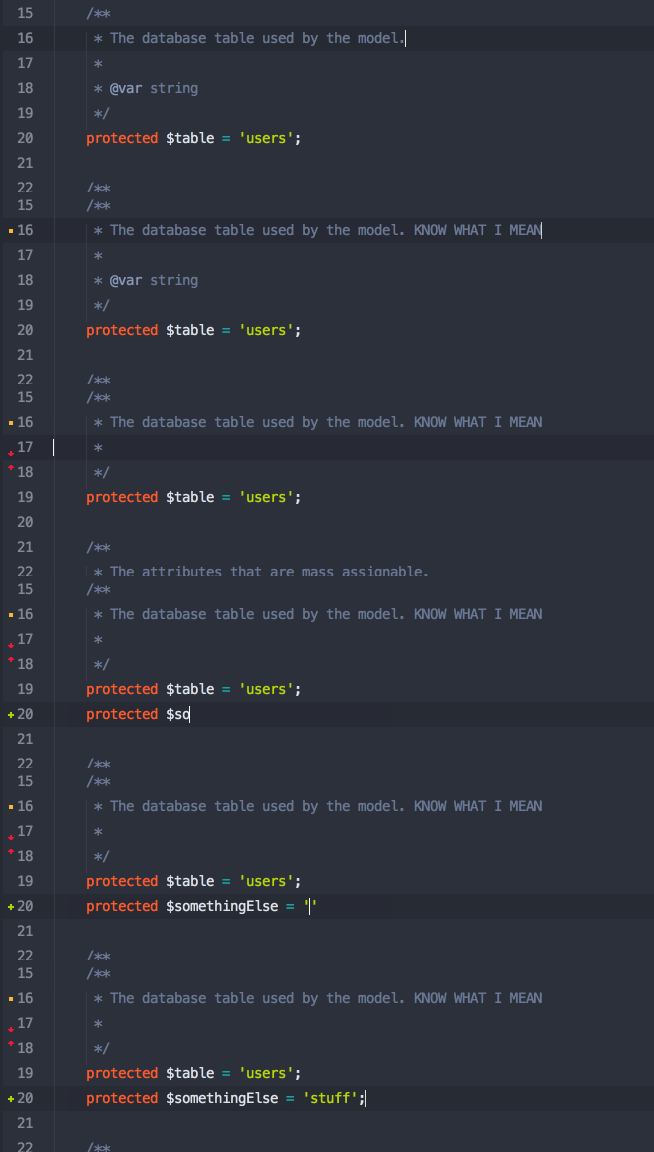
GitGutter shows you diff information regarding each line's status--has it been modified, inserted, or deleted?
This is not nearly as powerful as PHPStorm's Git gutters, but it's a step in the right direction.
GitGutter

Syntax Highlighting

PHPUnit Build 

There's a great plugin that makes it super easy to run PHPUnit from the command palette or a keyboard shortcut: SimplePHPUnit
Just like the name implies, you install the package and you're up and running.

CodeIntel 

CodeIntel is supposed to provide Sublime Text intelligence about the language you're working in. It should provide autocompletion, easy jump-to-definition, and information about the function you're currently working in.
Why do I keep saying "should" and "supposed to"? Because I have yet to meet a PHP developer who can get CodeIntel up and running consistently and predictably. Have you? Hit me up.

Other Plugins 

When I asked around on Twitter, plenty of folks shared plugins. Since I don't use these, I can only share them vaguely, but I'm sure they're all worth a quick check.
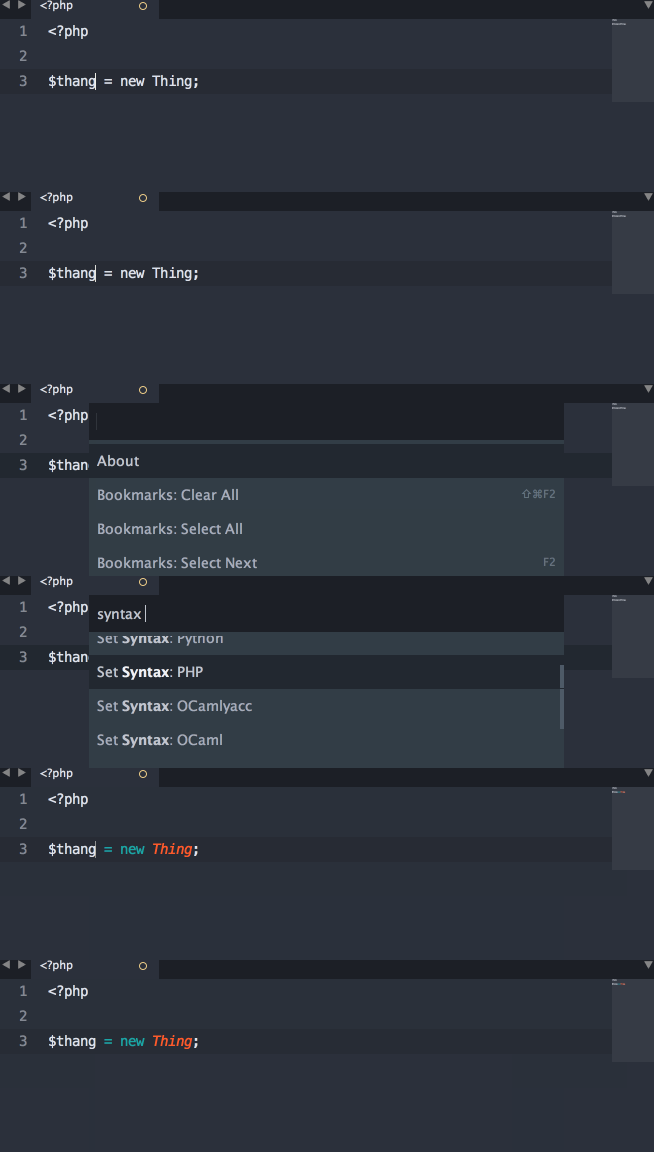
  • ApplySyntax extends Sublime Text's ability to determine which syntax to apply to your current file
  • DashDoc makes it easy for Mac users with the Dash application to look up any word in Dash
  • Function Name Display adds information to the status bar about the current file, class, and function/method name
  • phpfmt looks like an alternative to PHP CS Fixer
  • CodeComplice is code intel, but newer—maybe this is the solution?!
  • Xdebug Client
  • EditorConfig is a standard to share particular editor configuration patterns for each project. This plugin lets you import and use them in Sublime Text. (learn more about the EditorConfig format)
  • SublimePrettyJSON is great for quickly formatting JSON
  • CaseConversion makes it simple to convert between snake_case and camelCase and PascalCase and split and join words and everything else.

CodeBug for Xdebug 

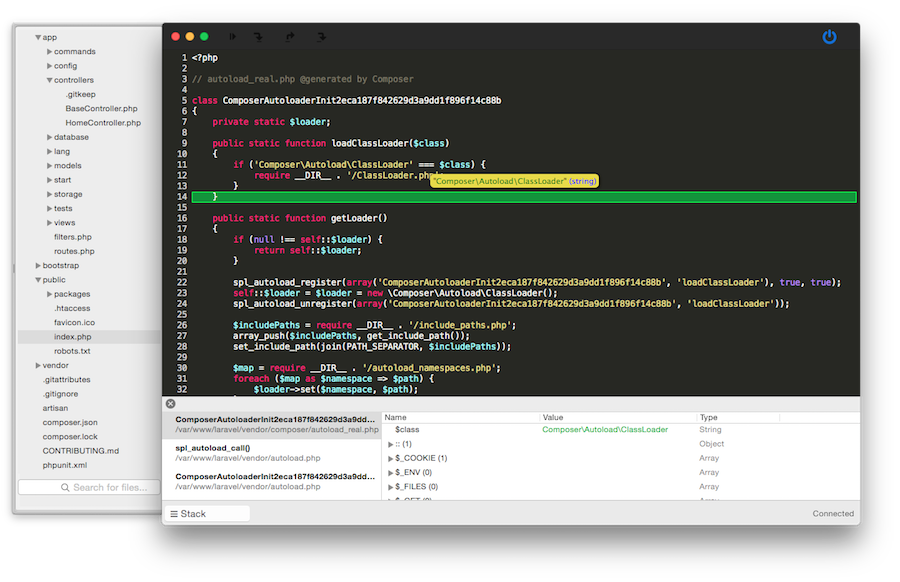
Do you miss the Xdebug integration in PHPStorm? Check out Codebug, a standalone xdebug client.
Codebug Screenshot

A Few General Sublime Text Tips 

This post is not an introduction to all things Sublime Text, but I do want to cover a few important pieces here.

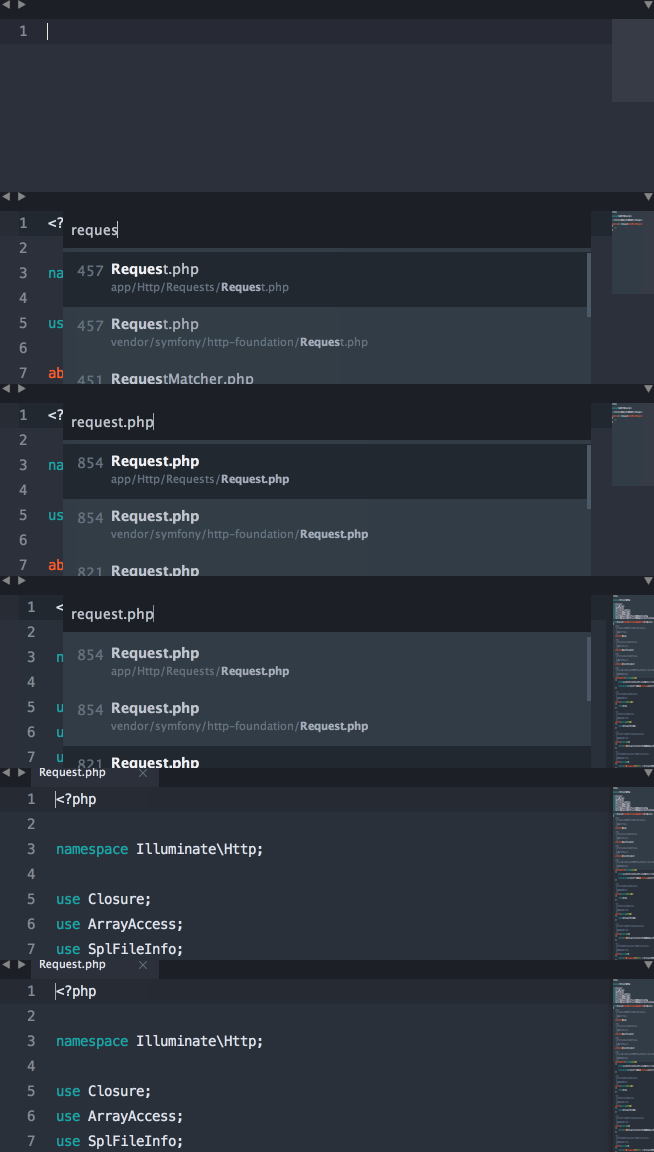
Finding files with "Goto Anything" (cmd-p) 

If you press super-P you'll get the wildly powerful Goto Anything palette, which allows you to easily find files, but you can go a bit further: if you find your file (e.g. by typing Handler.php), you can also trigger opening it at a certain line (Handler.php:35) or at a certain symbol ().
Goto Anything

Finding commands with the Command Palette (cmd-shift-p) 

While the Goto Anything palette lets you search for files in your project, the Command Palette allows you to search for commands.
This means that any command that Sublime Text lets you perform (run builds, rename files, etc.), but also those from third-party packages (Sniff this file, etc.) can be run purely from the keyboard, even if you don't know (or have) the keyboard shortcut.
Command Palette

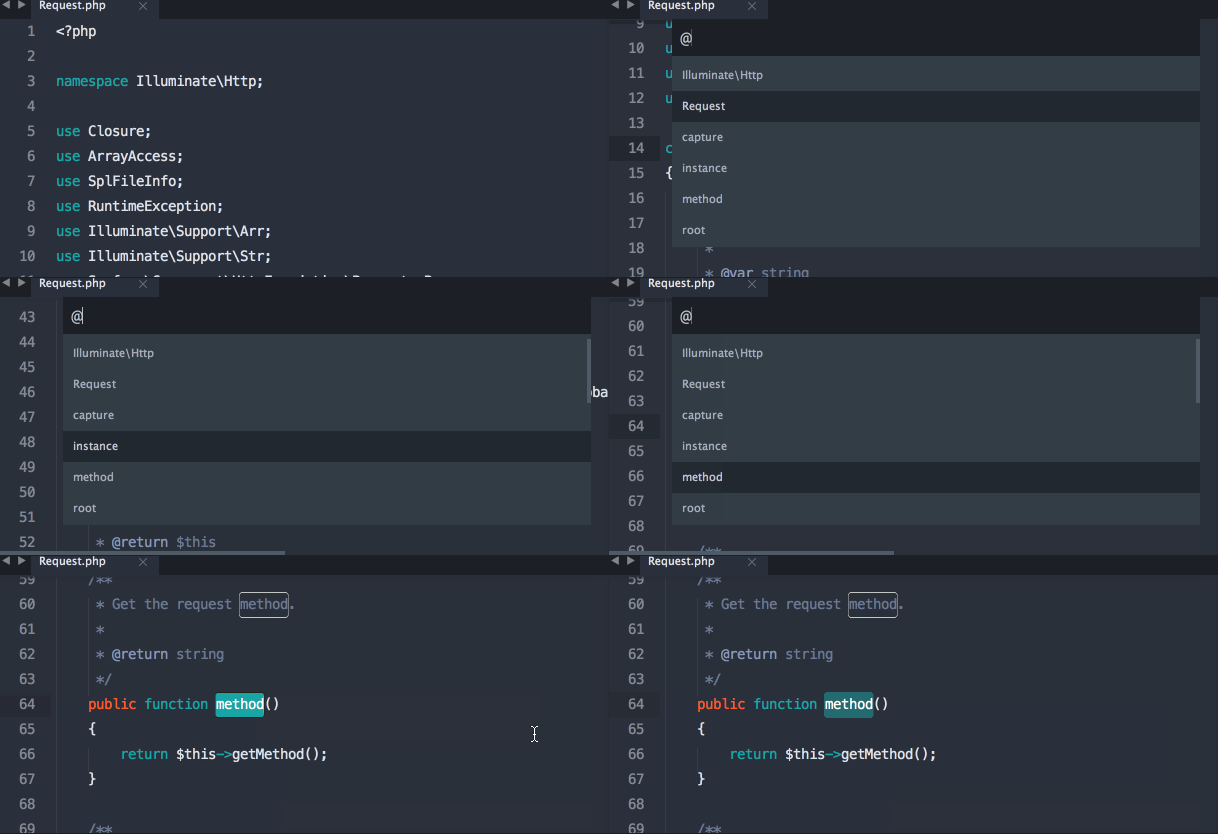
Finding symbols with "Goto Symbols" (cmd-r) 

If you press super-R you'll get the Goto Symbol palette, which will navigate to any symbol in your current file.
Symbols are things like classes, methods, or functions.
Goto Symbols

Multiple cursors 

Many editors have added multiple cursors, but Sublime Text still does it the best.
If you've never tried it, go learn about it somewhere, but here's a quick intro:
Open up a file. Hold "super" (cmd on Mac) and click several places around the file. Now start typing. BOOM.
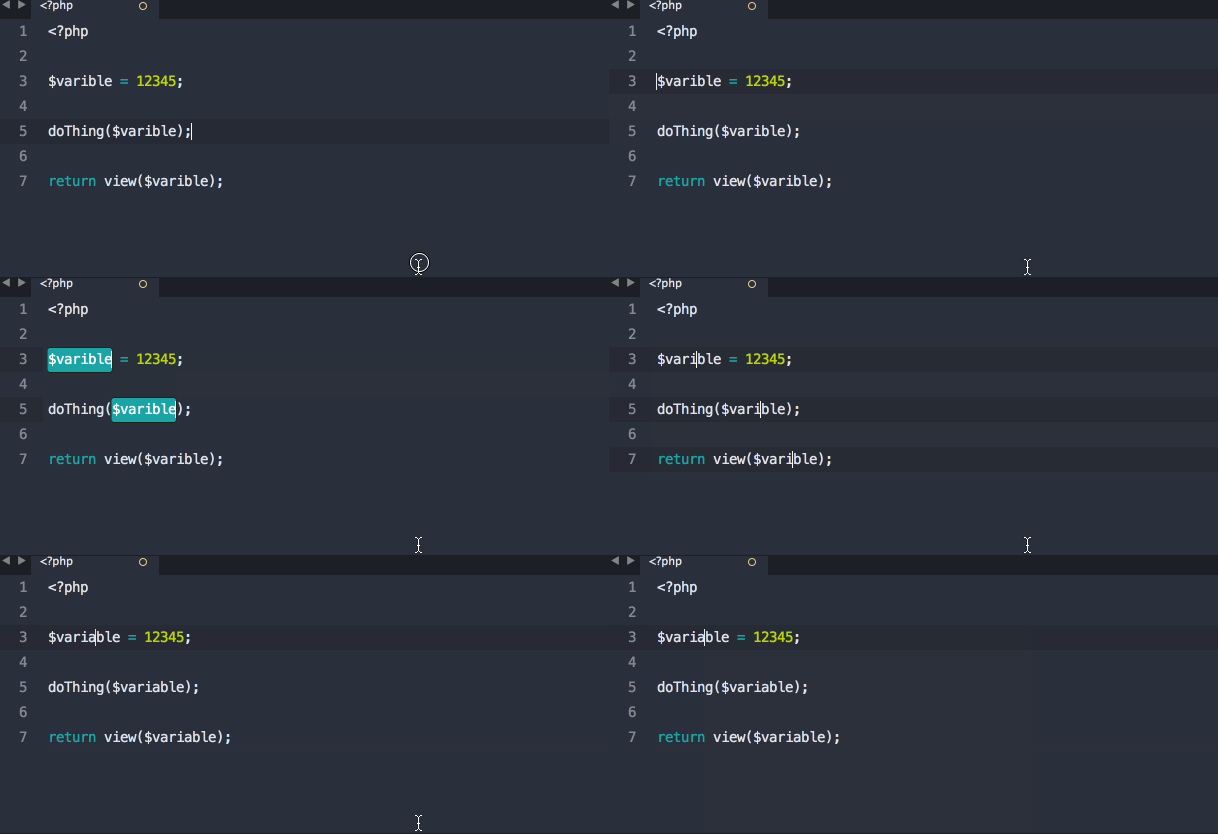
Another great trick: Place your cursor on a common word (for example, a variable name). Now press Super-D a few times. You now have several instances of that variable selected and you can manipulate them all at once.
Multiple selection
Or, select five lines and press Super-shift-l. Check it.
There's a lot more you can do with this if you get creative.

Fuzzy matching 

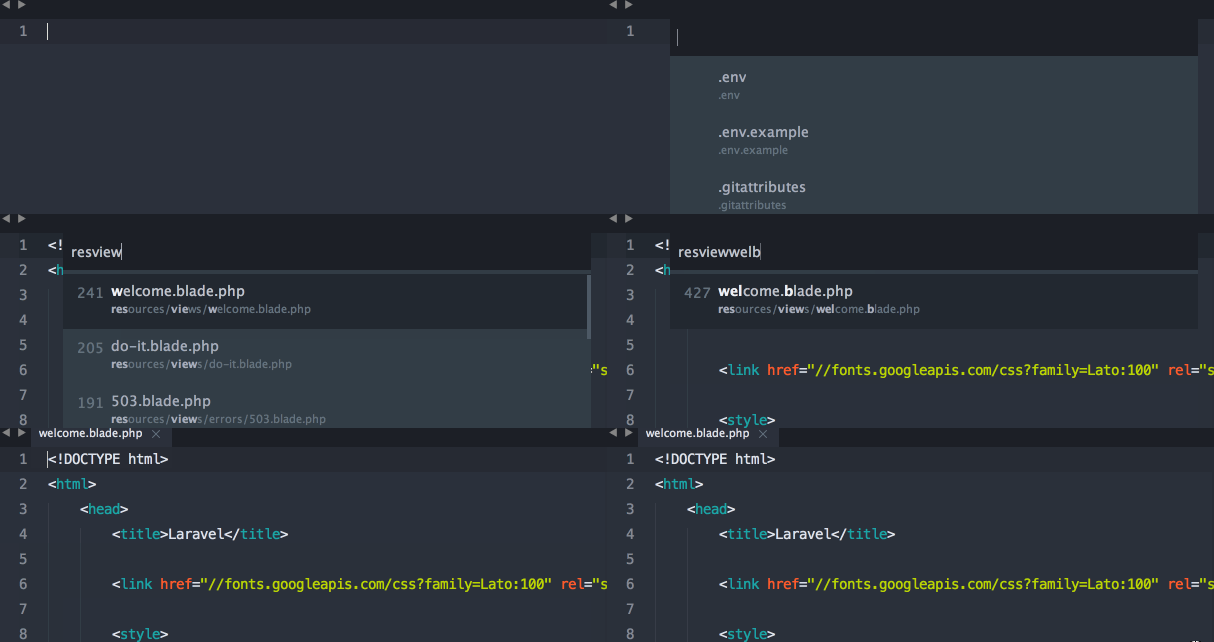
Did you know that when you're using any of the command palettes in Sublime Text, you don't have to finish one word?
In most editors (like PHPStorm), if you wanted to find a file named resources/views/conferences/edit.blade.php, you could type resources/views/conferences/edit.blade.php or conferences/edit.blade.php, but in Sublime Text all you would need is something like resvieconedblp. Just type enough that the order of letters you're typing could only exist in the string you're looking for, and you'll be good to go. Skip a letter here, skip a slash there--no problem.
Sublime Text Fuzzy Matching

Miscellany 

There's a lot more to learn about how Sublime Text works, and a lot of tools and courses available to you. This is not a comprehensive resource for everything that's great about Sublime; those guides have already been written.
If you want to learn more about Sublime Text, there are two excellent resources I'd consider checking out.
  • Sublime Text Power User is a book and video series by my friend Wes Bos that teaches you everything you need to use Sublime Text like a boss. It's the easiest way for someone new to Sublime Text to get up and running quickly. Also, I reached out to Wes and he gave me a GEEK coupon to get you $10 off (disclaimer: it helps me out, too.)
  • ShortcutFoo is a great resource for learning keyboard shortcuts for any environment. They've got programs for everything from Vim to Sublime Text to Photoshop to Excel.

The Verdict 

Let's take a look at our list and see what we've handled:
  • Class FQCN inline completion (Sublime PHP Companion)
  • Easily navigate to a symbol's definition (Sublime PHP Companion)
  • Navigate to a symbol's definition (Sublime PHP Companion)
  • Easy constructor injection (Macro?)
  • Highlight unused imports (SublimeLinter)
  • Git gutters (GitGutter)
  • Code sniffing/PSR-2 validation (SublimePHPCS etc.)
  • Code Completion: PHP
  • Code Completion: project code
Not bad, actually. Let's talk about what's missing:
  • Construction injection (e.g. simplifying injecting a property into the constructer as a property, setting it in the constructor, and defining the class property) is something I think can be solved with a clever macro—but I haven't seen that clever macro yet.
  • CodeIntel purports to offer PHP code completion, so it's just a matter of getting that working. But I don't think (correct me if I'm wrong) anything in the Sublime Text world claims to sniff the definitions of your code and then provide autocompletion and parameter suggestion. So that's a big shortcoming for sure. Note, however: AllAutocomplete definitely relieves this pain a little.
What's my verdict? As always, it depends. I think it'll depend some on the project, some on the developer, and some on whether or not I can find solutions to some of the issues above. But I'm definitely leaning on Sublime Text a lot more than I was six months ago—it's just so darn fast.

Postscript 

Are there any Sublime Text tips for PHP developers that I missed? Let me know on Twitter.
Are there any PHPStorm features that I didn't cover here that you think are vital to every developer's toolkit? Let me know that too.
Also: I couldn't've written this without Adam Wathan, Taylor Otwell, Jeffrey Way, and many, many other friends on Twitter.

Read More